A Flexible and Configurable Serverless Elastic Solution at the Workload Level

Serverless represents an extension of cloud computing, inheriting its most significant feature: on-demand elastic scaling. This model design allows developers to focus on application logic without concerning themselves with deployment resources, thereby fully leveraging resource scalability to provide superior elasticity capabilities. Enterprises can also genuinely benefit from true pay-as-you-go characteristics. Consequently, more cloud providers are converging towards this new architectural paradigm.
The core capability of "flexible configurability" in Serverless technology focuses on enabling specific cloud usage
scenarios to fully utilize cloud resources through simple, minimally invasive, and highly configurable methods. Its
essence lies in resolving the conflict between capacity planning and actual cluster load configuration. This article
will sequentially introduce two configurable components — WorkloadSpread and UnitedDeployment — discussing their
core capabilities, technical principles, advantages and disadvantages, as well as real-world applications. Through these
discussions, we aim to share OpenKruise's technical evolution and considerations in addressing Serverless workload
elasticity.
Overview of Elastic Scenarios
As Serverless technology matures, more enterprises prefer using cloud resources (such as Alibaba Cloud ACS Serverless container instances) over on-premise resources (like managed resource pools or on-premise IDC data centers) to host applications with temporary, tidal, or bursty characteristics. This approach enhances resource utilization efficiency and reduces overall costs by adopting a pay-as-you-go model. Below are some typical elastic scenarios:
- Prioritize using on-premise resources in offline IDC data centers; scale application to the cloud when resources are insufficient.
- Prefer using pre-paid resource pool in the cloud; use pay-as-you-go Serverless instances for additional replicas when resources are insufficient.
- Use high-quality stable compute power (e.g., dedicated cloud server instances) first; then use lower-quality compute power (e.g., Spot instances).
- Configure different resource quantities for container replicas deployed on different compute platforms (e.g., X86, ARM, Serverless instances) to achieve similar performance.
- Inject different middleware configurations into replicas deployed on nodes versus Serverless environments (e.g., shared Daemon on nodes, Sidecar injection on Serverless).
These components introduced in this article offer distinct advantages in solving the above problems. Users can choose appropriate capabilities based on their specific scenarios to effectively leverage elastic compute power.
Capabilities and Advantageous Scenarios of Two Components
- WorkloadSpread: Utilizes a Mutating Webhook to intercept Pod creation requests that meet certain criteria and apply Patch operations to inject differentiated configurations. Suitable for existing applications requiring multiple elastic partitions with customized Pod Metadata and Spec fields.
- UnitedDeployment: A workload with built-in capability of elastic partitioning and pod customization, offering stronger elasticity and capacity planning capabilities. Ideal for new applications needing detailed partitioning and individual configurations for each partition.
WorkloadSpread: An Elastic Strategy Plugin Based on Pod Mutating Webhook
WorkloadSpread is a bypass component provided by the OpenKruise community that spreads target workload Pods across different types of subsets according to specific rules, enhancing multi-region and elastic deployment capabilities without modifying the original workload. It supports almost all native or custom Kubernetes workloads, ensuring adaptability and flexibility in various environments.
Example Configuration
apiVersion: apps.kruise.io/v1alpha1
kind: WorkloadSpread
metadata:
  name: workloadspread-demo
spec:
  targetRef: # Supports almost all native or custom Kubernetes workloads
    apiVersion: apps/v1 | apps.kruise.io/v1alpha1
    kind: Deployment | CloneSet
    name: workload-xxx
  subsets:
    - name: subset-a
      # The first three replicas will be scheduled to this Subset
      maxReplicas: 3
      # Pod affinity configuration
      requiredNodeSelectorTerm:
        matchExpressions:
          - key: topology.kubernetes.io/zone
            operator: In
            values:
              - zone-a
      patch:
        # Inject a custom label to Pods scheduled to this Subset
        metadata:
          labels:
            xxx-specific-label: xxx
    - name: subset-b
      # Deploy to Serverless clusters, no capacity and unlimited replicas
      requiredNodeSelectorTerm:
        matchExpressions:
          - key: topology.kubernetes.io/zone
            operator: In
            values:
              - acs-cn-hangzhou
  scheduleStrategy:
    # Adaptive mode will reschedule failed Pods to other Subsets
    type: Adaptive | Fixed
    adaptive:
      rescheduleCriticalSeconds: 30
Powerful Partitioning Capability
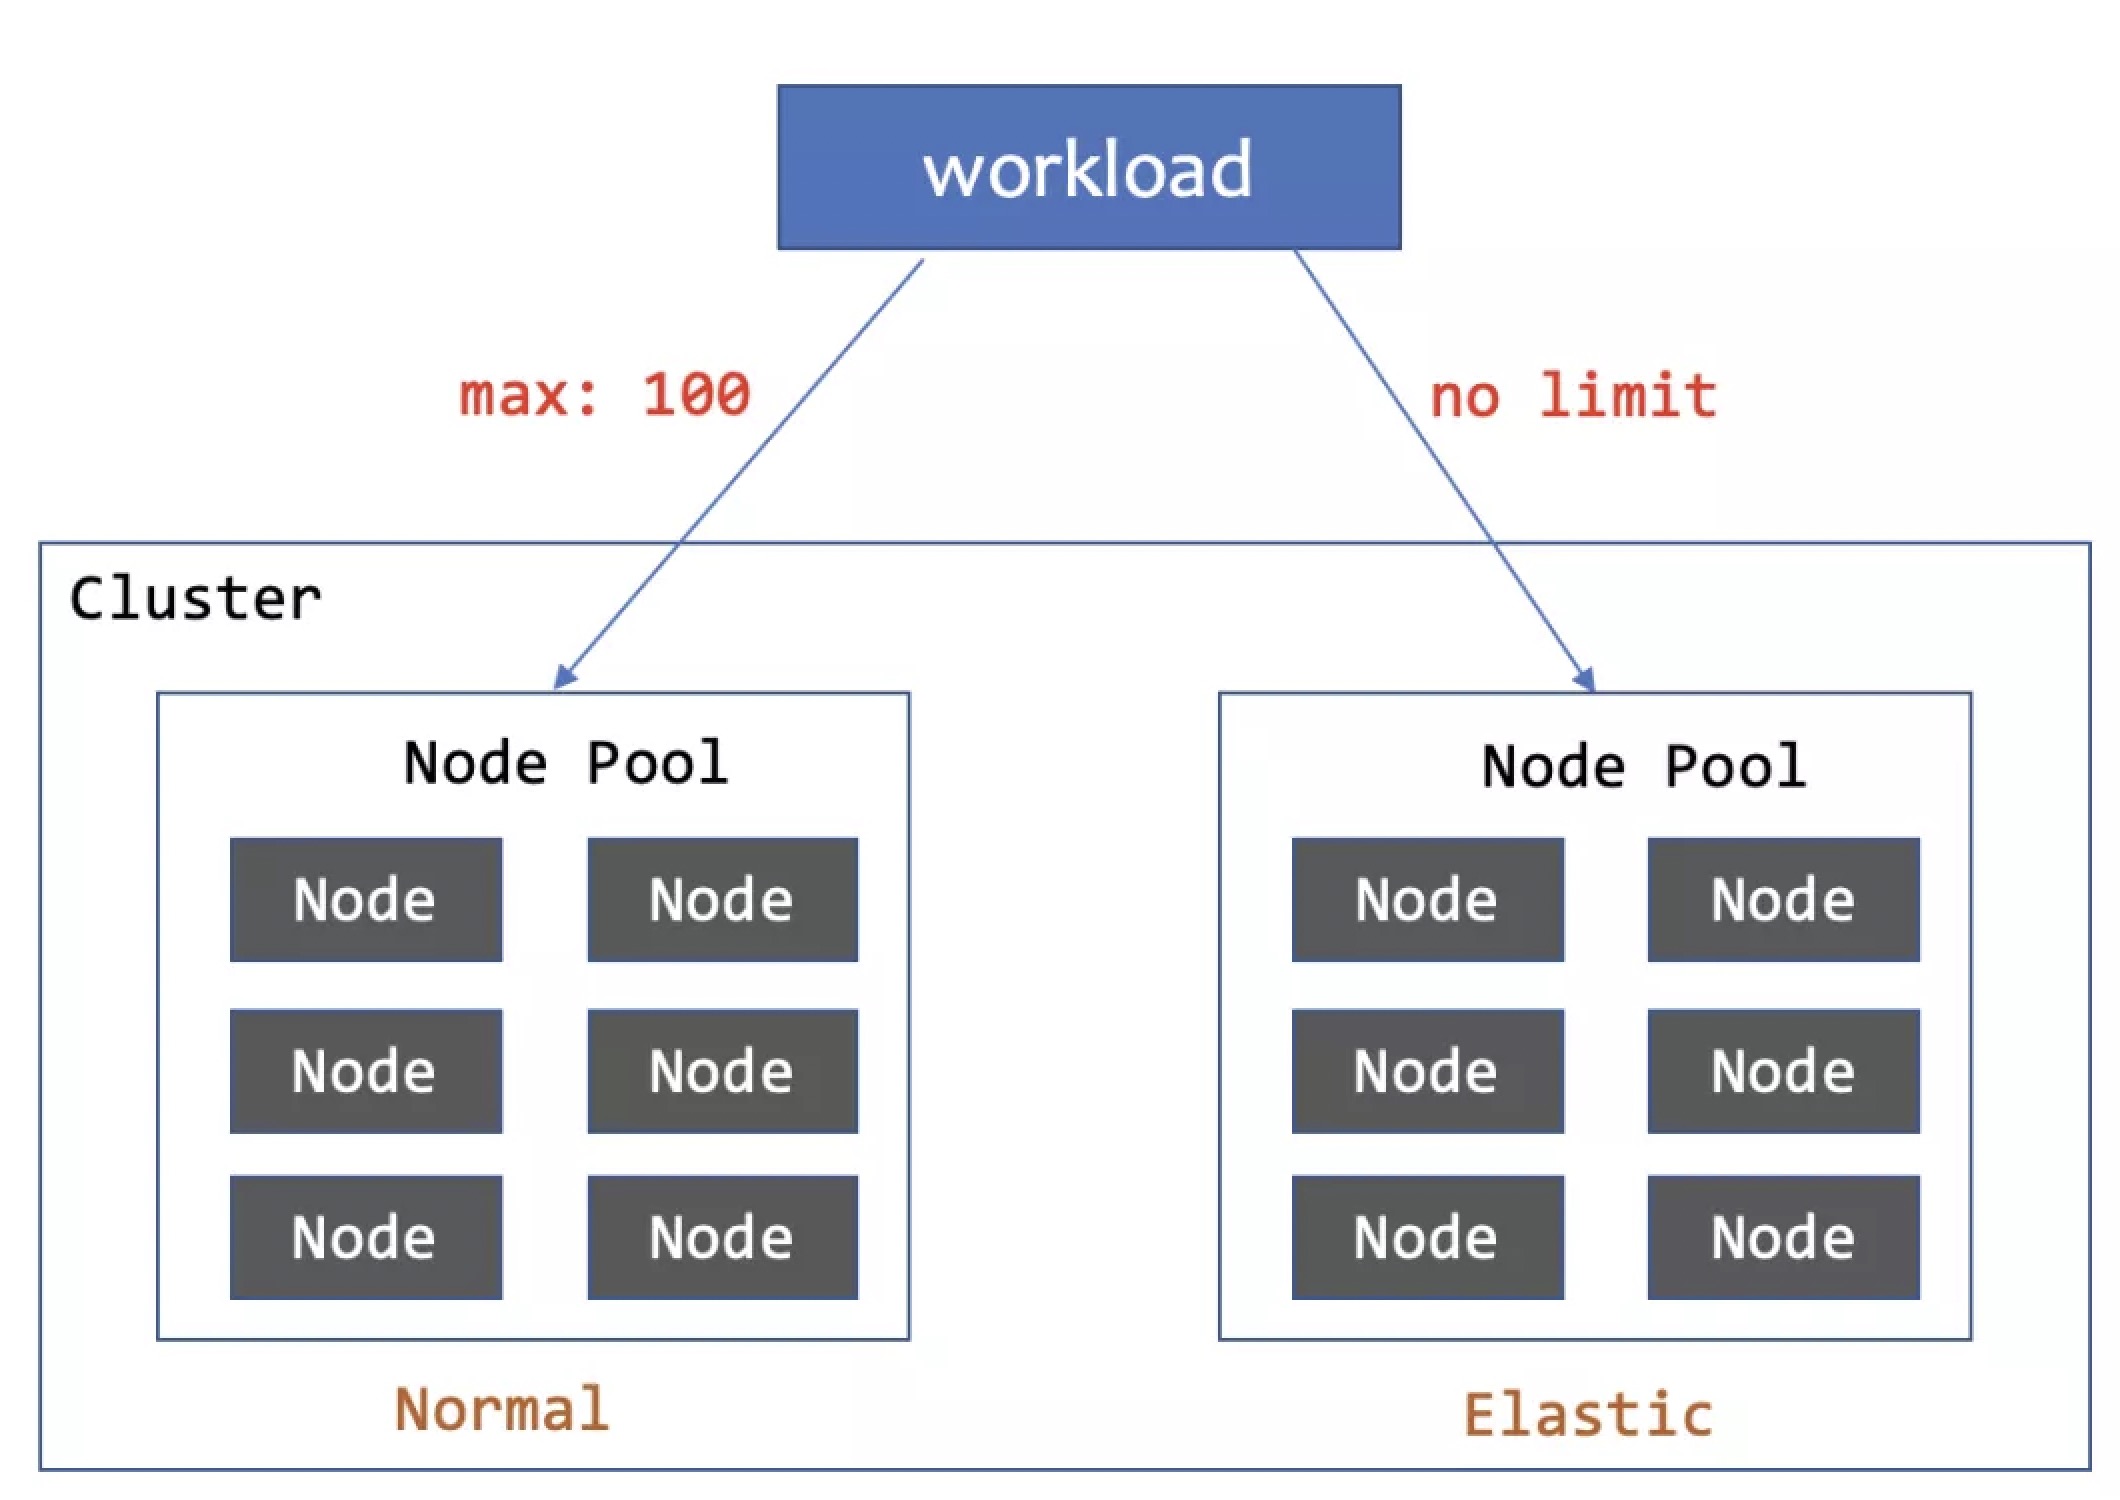
WorkloadSpread spreads Pods into different elastic partitions using Subsets, scaling up forward and scaling down backward based on Subset order.
Flexible Scheduling Configuration
At the Subset level, WorkloadSpread supports selecting nodes via Labels and configuring advanced options such as taints
and tolerations. For example, requiredNodeSelectorTerm specifies mandatory node attributes,
preferredNodeSelectorTermssets preferred node attributes, and tolerations configures Pod tolerance for node taints.
These configurations allow precise control over Pod scheduling and distribution.
At the global level, WorkloadSpread supports two scheduling strategies via the scheduleStrategy field: Fixed and
Adaptive. The Fixed strategy ensures strict adherence to predefined Subset distributions, while the Adaptive strategy
provides higher flexibility by automatically rescheduling Pods to other available Subsets when necessary.
Detailed Pod Customization
In Subset configurations, the patch field allows for fine-grained customization of Pods scheduled to that subset.
Supported fields include container images, resource limits, environment variables, volume mounts, startup commands,
probe configurations, and labels. This decouples Pod specifications from environment adaptations, enabling flexible
workload adjustments for various partition environments.
...
# patch pod with a topology label:
patch:
  metadata:
    labels:
      topology.application.deploy/zone: "zone-a"
...
The example above demonstrates how to add or modify a label to all Pods in a Subset.
...
# patch pod container resources:
patch:
  spec:
    containers:
      - name: main
        resources:
          limit:
            cpu: "2"
            memory: 800Mi
...
The example above demonstrates how to add or modify the Pod Spec.
...
# patch pod container env with a zone name:
patch:
  spec:
    containers:
      - name: main
        env:
          - name: K8S_AZ_NAME
            value: zone-a
...
The example above demonstrates how to add or modify a container environment variable.
WorkloadSpread's Pod Mutating Webhook Mechanism
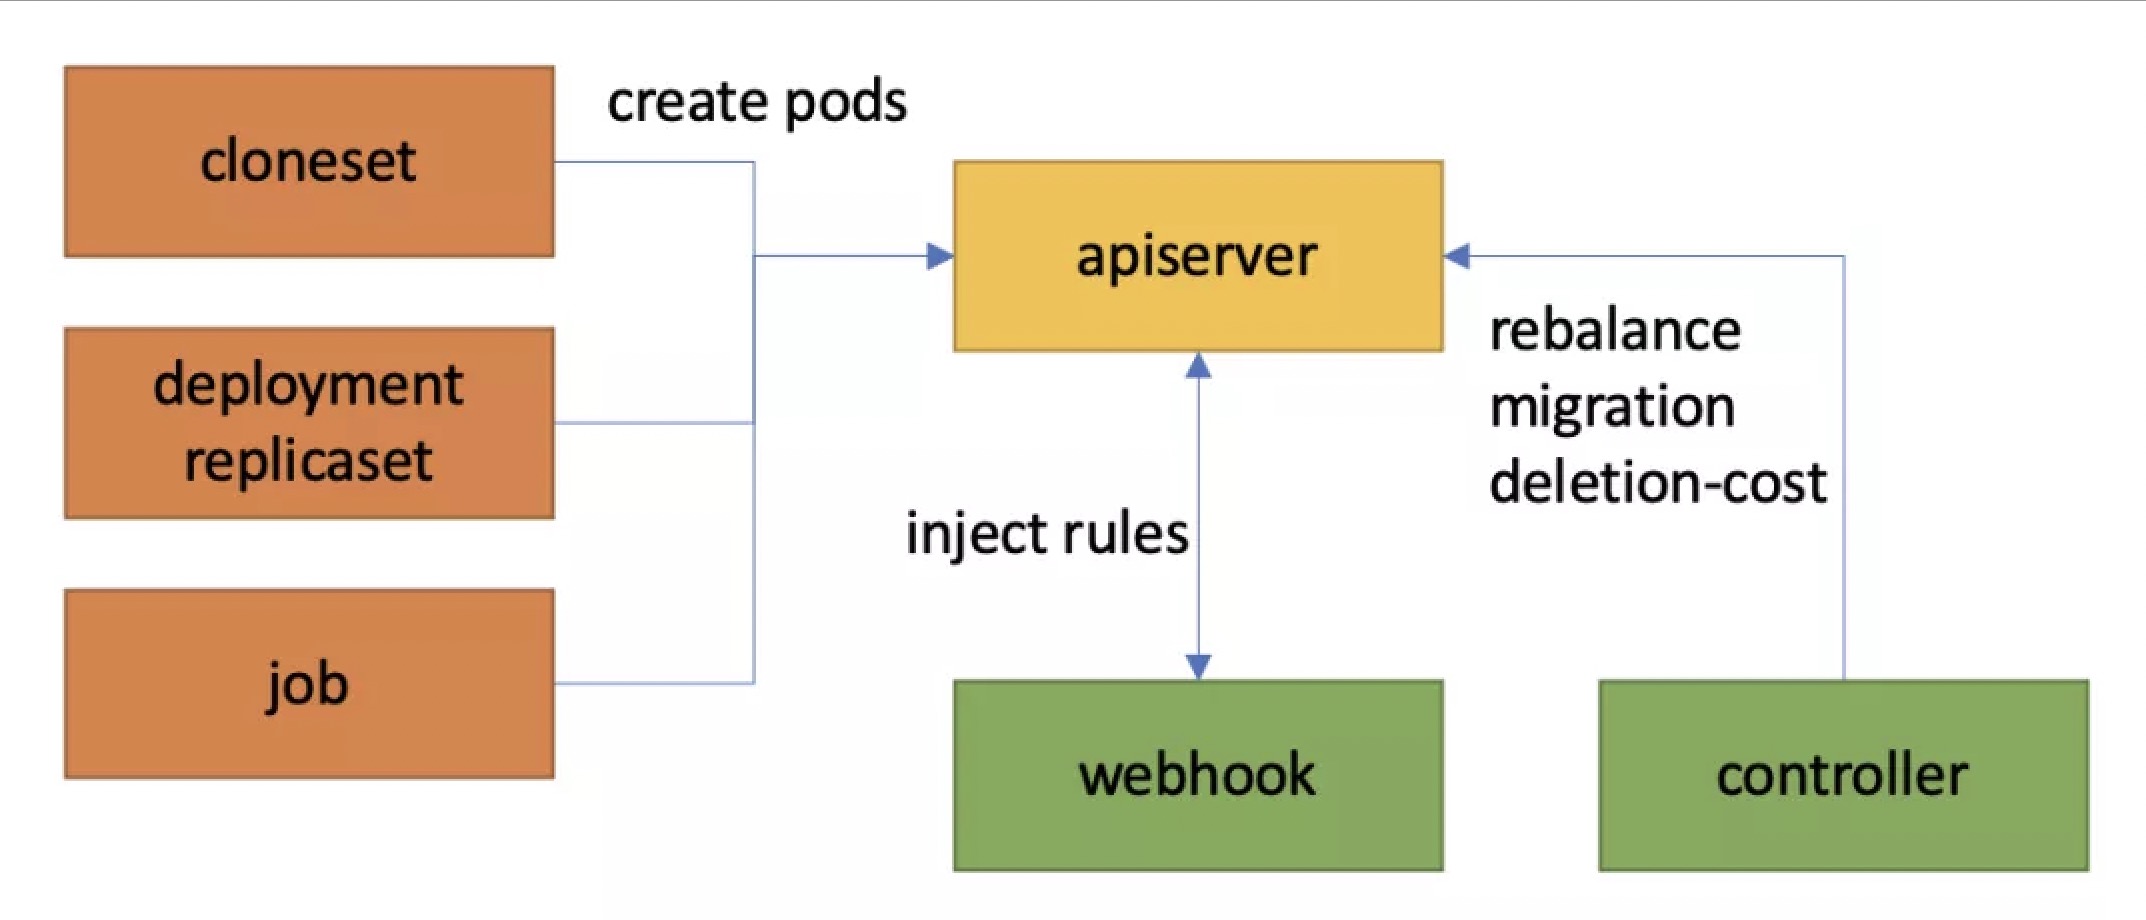
WorkloadSpread operates directly on Pods created by the target workload via Pod Mutating Webhook, ensuring non-intrusive operation. When a Pod creation request meets the criteria, the Webhook intercepts it, reads the corresponding WorkloadSpread configuration, selects an appropriate Subset, and modifies the Pod configuration accordingly. The controller maintains the controller.kubernetes.io/pod-deletion-cost label to ensure correct downsizing order.
Limitations of WorkloadSpread
Potential Risks of Webhook
WorkloadSpread depends on Pod Mutating Webhook to function, which intercepts all Pod creation requests in the cluster. If the Webhook Pod (kruise-manager) experiences performance issues or failures, it may prevent new Pods from being created. Additionally, during large-scale scaling operations, Webhook can become a performance bottleneck.
Limitations of Acting on Pods
While acting on Pods reduces business intrusion, it introduces limitations. For instance, CloneSet's gray release ratio cannot be controlled per Subset.
Case Study 1: Bandwidth Package Allocation in Large-Scale Load Testing
A company needed to perform load testing before a major shopping festival. They developed a load-agent program to generate requests and used a CloneSet to manage agent replicas. To save costs, they purchased 10 shared bandwidth packages (each supporting 300 Pods) and aimed to dynamically allocate them to elastic agent replicas.
They configured a WorkloadSpread with 11 Subsets: the first 10 Subsets had a capacity of 300 and patched Pod Annotations to bind specific bandwidth packages; the last Subset had no capacity and no bandwidth package, preventing extra bandwidth allocation if more than 3000 replicas were created.
apiVersion: apps.kruise.io/v1alpha1
kind: WorkloadSpread
metadata:
  name: bandwidth-spread
  namespace: loadtest
spec:
  targetRef:
    apiVersion: apps.kruise.io/v1alpha1
    kind: CloneSet
    name: load-agent-XXXXX
  subsets:
    - name: bandwidthPackage-1
      maxReplicas: 300
      patch:
        metadata:
          annotations:
            k8s.aliyun.com/eip-common-bandwidth-package-id: <id1>

    - ...

    - name: bandwidthPackage-10
      maxReplicas: 300
      patch:
        metadata:
          annotations:
            k8s.aliyun.com/eip-common-bandwidth-package-id: <id10>
    - name: no-eip
Case Study 2: Compatibility for Scaling Managed K8S Cluster Services to Serverless Instances
A company had a web service running on an IDC that needed to scale up due to business growth but could not expand the local data center. They chose to use virtual nodes to access cloud-based Serverless elastic compute power, forming a hybrid cloud. Their application used acceleration services like Fluid, which were pre-deployed on nodes in the IDC but not available in the serverless subset. Therefore, they needed to inject a sidecar into cloud Pods to provide acceleration capabilities.
To achieve this without modifying the existing Deployment's 8 replicas, they used WorkloadSpread to add a label to Pods scaled to each subset, which controlled the Fluid sidecar injection.
apiVersion: apps.kruise.io/v1alpha1
kind: WorkloadSpread
metadata:
  name: data-processor-spread
spec:
  targetRef:
    apiVersion: apps/v1
    kind: Deployment
    name: data-processor
  subsets:
    - name: local
      maxReplicas: 8
      patch:
        metadata:
          labels:
            serverless.fluid.io/inject: "false"
    - name: aliyun-acs
      patch:
        metadata:
          labels:
            serverless.fluid.io/inject: "true"
UnitedDeployment: A Native Workload with Built-in Elasticity
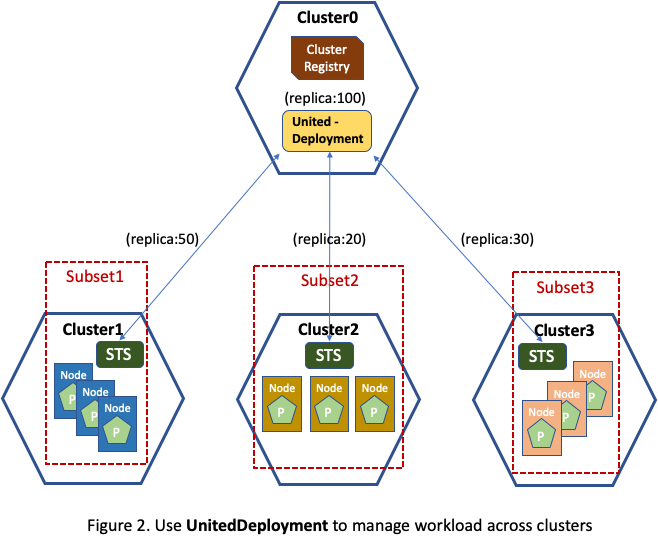
UnitedDeployment is an advanced workload provided by the OpenKruise community that natively supports partition management. Unlike WorkloadSpread, which enhances basic workloads, UnitedDeployment offers a new mode for managing partitioned elastic applications. It defines applications through a single template, and the controller creates and manages multiple secondary workloads to match different subsets. UnitedDeployment manages the entire lifecycle of applications within a single resource, including definition, partitioning, scaling, and upgrades.
Example Configuration
apiVersion: apps.kruise.io/v1alpha1
kind: UnitedDeployment
metadata:
  name: sample-ud
spec:
  replicas: 6
  selector:
    matchLabels:
      app: sample
  template:
    cloneSetTemplate:
      metadata:
        labels:
          app: sample
      spec:
        # CloneSet Spec
        ...
  topology:
    subsets:
      - name: ecs
        nodeSelectorTerm:
          matchExpressions:
            - key: node-type
              operator: In
              values:
                - ecs
        maxReplicas: 2
      - name: acs-serverless
        nodeSelectorTerm:
          matchExpressions:
            - key: node-type
              operator: In
              values:
                - acs-virtual-kubelet
Advantages of UnitedDeployment
All-In-One Elastic Application Management
UnitedDeployment offers comprehensive all-in-one application management, enabling users to define applications, manage subsets, scale, and upgrade using a single resource.
The UnitedDeployment controller manages a corresponding type of secondary workload for each subset based on the workload template, without requiring additional attention from the user. Users only need to manage the application template and subsets; the UnitedDeployment controller will handle subsequent management tasks for each secondary workload, including creation, modification, and deletion. The controller also monitors the status of Pods created by these workloads when necessary to make corresponding adjustments.
It is the secondary workload controllers implement the specific scaling and updating operations. Thus, scaling and updating using UnitedDeployment produces exactly the same effect as directly using the corresponding workload. For example, a UnitedDeployment will inherit the same grayscale publishing and in-place upgrade capabilities from CloneSet when created with a CloneSet template.
Advanced Subset Management
UnitedDeployment incorporates two capacity allocation algorithms, enabling users to handle various scenarios of elastic applications through detailed subset capacity configurations.
The elastic allocation algorithm implements a classic elastic capacity allocation method similar to WorkloadSpread: by setting upper and lower capacity limits for each subset, Pods are scaled up in the defined order of subsets and scaled down in reverse order. This method has been thoroughly introduced earlier, so it will not be elaborated further here.
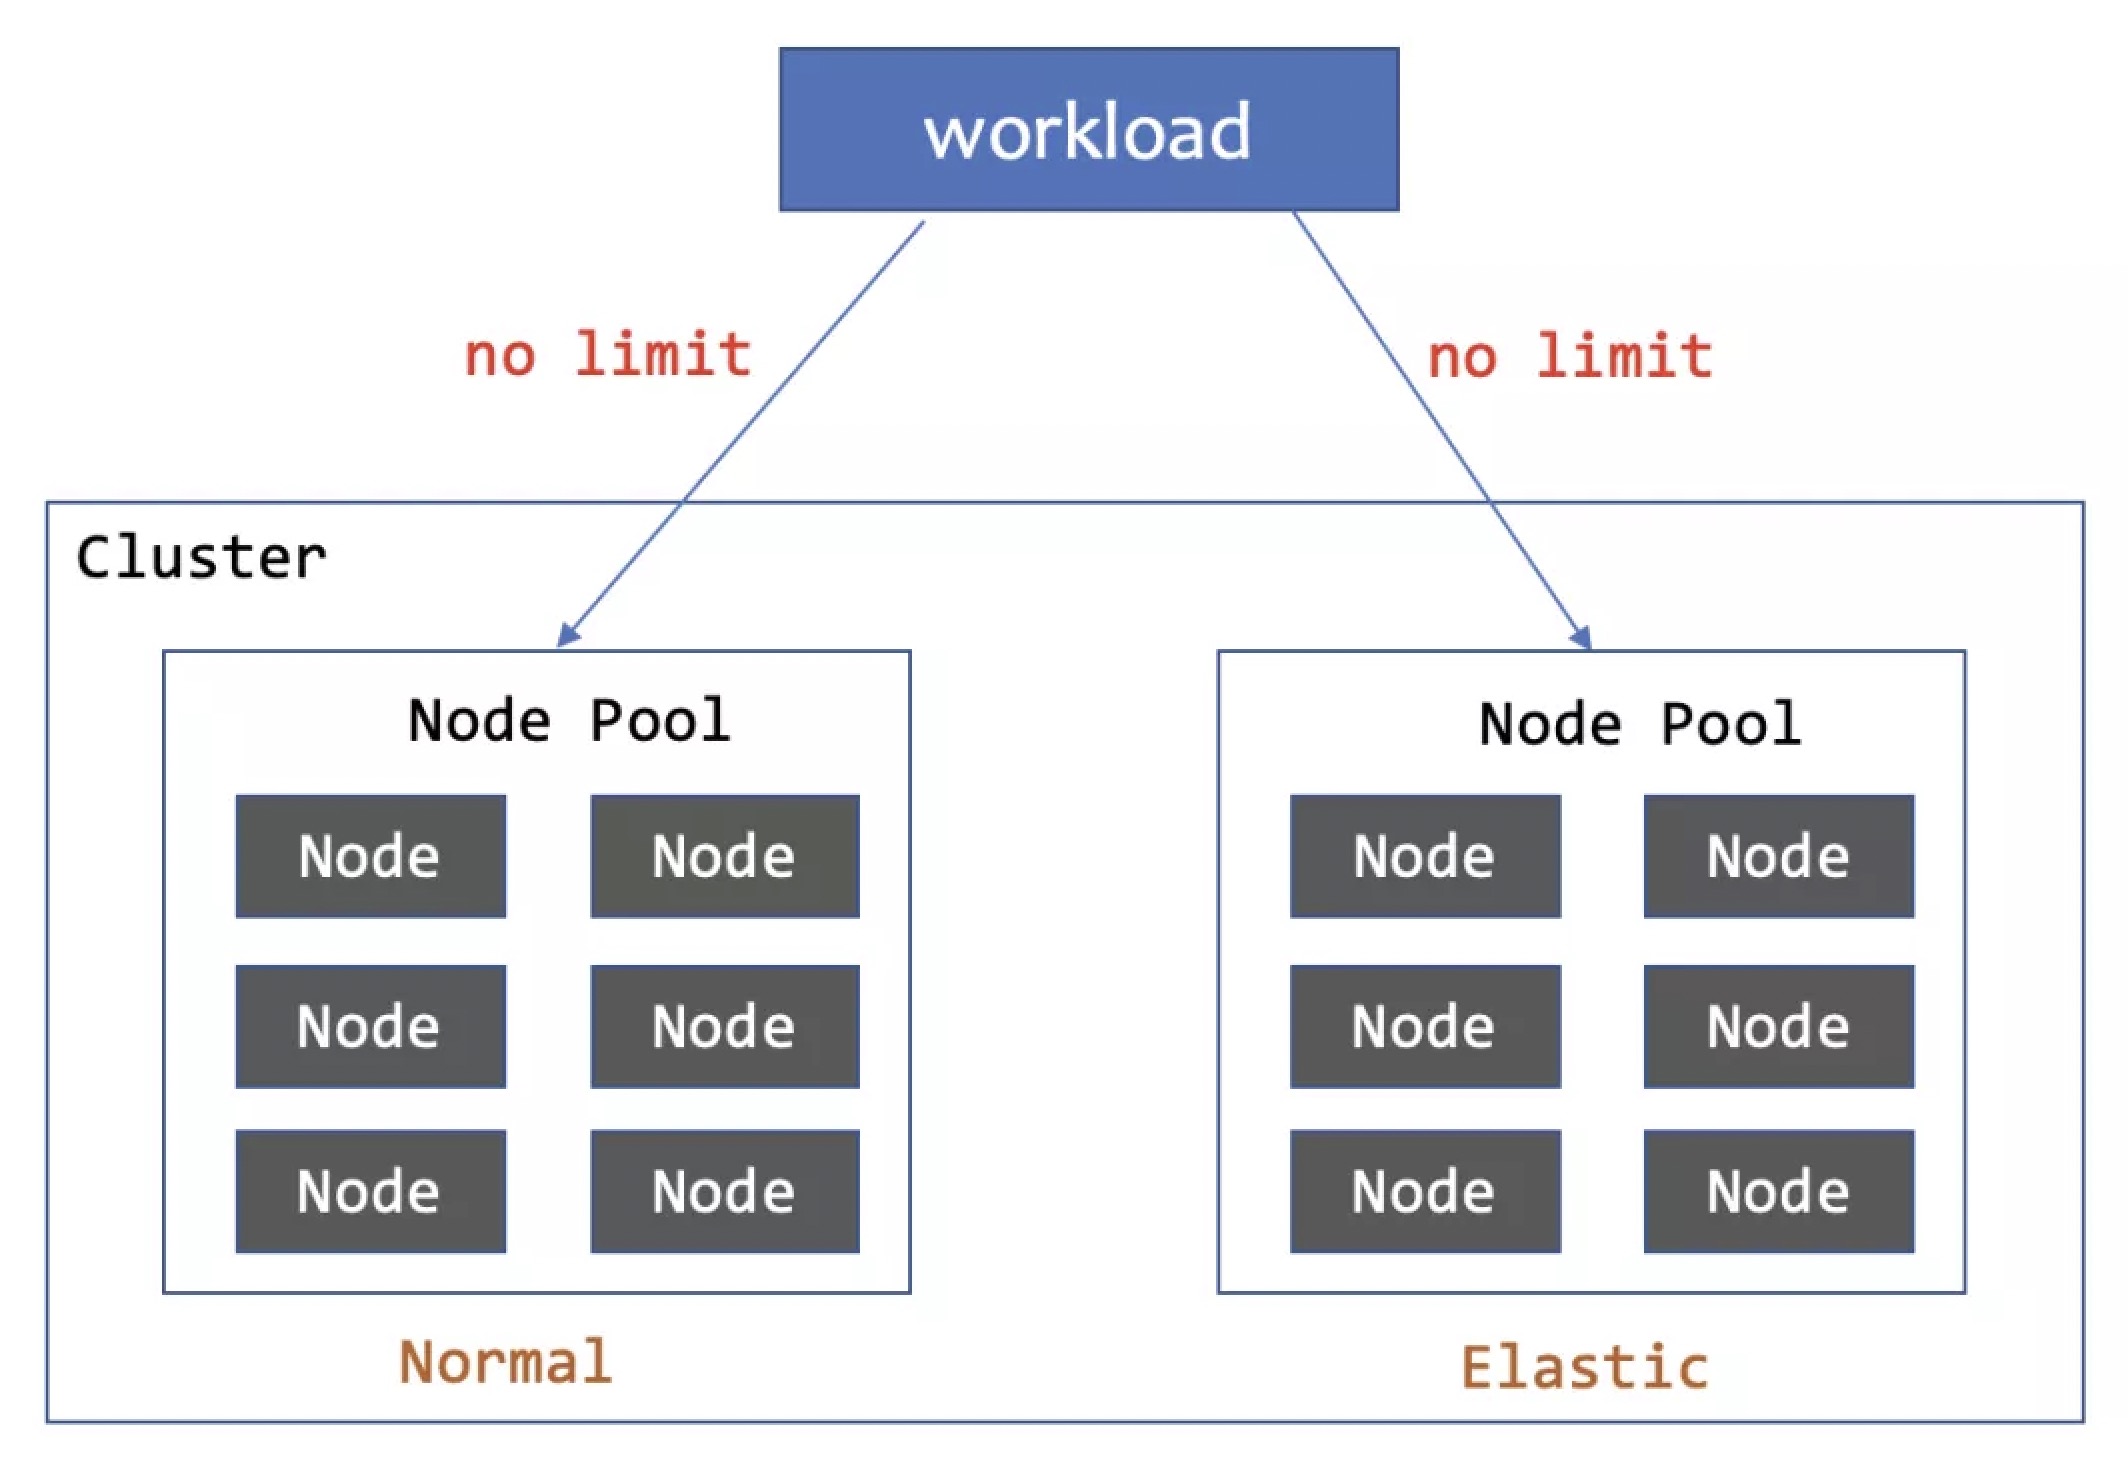
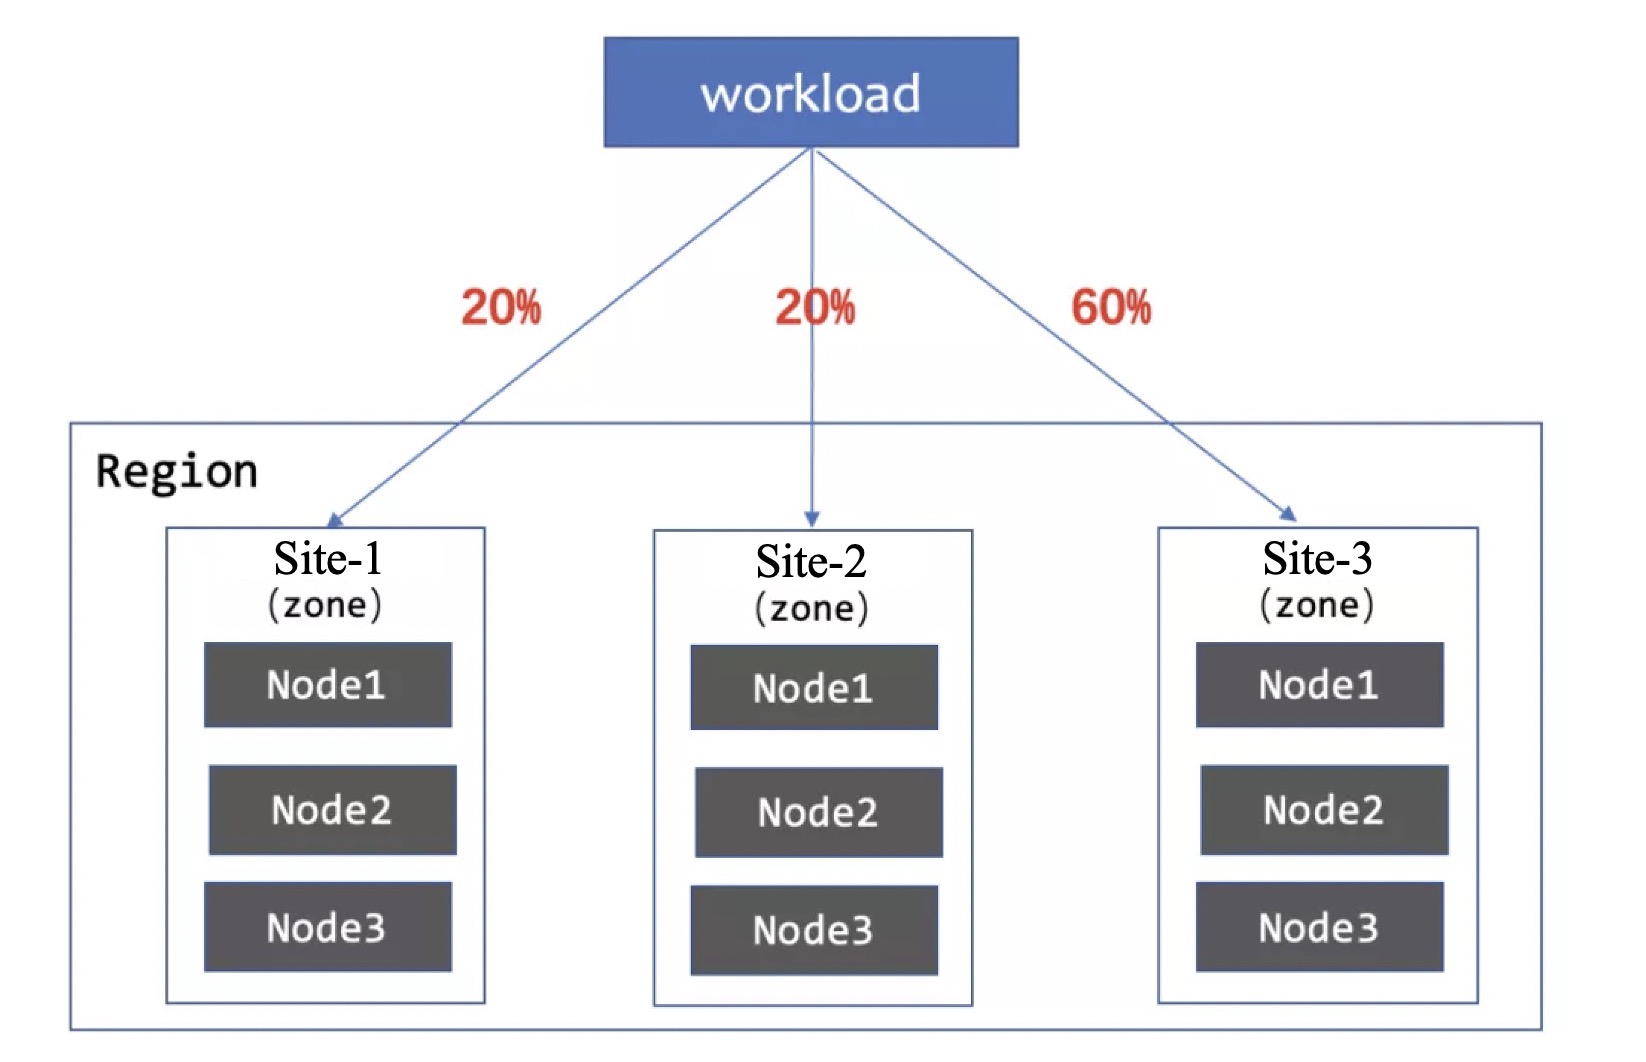
The specified allocation algorithm represents a new approach to capacity allocation. It directly assigns fixed numbers or percentages to some subsets and reserves at least one elastic subset to distribute the remaining replicas.
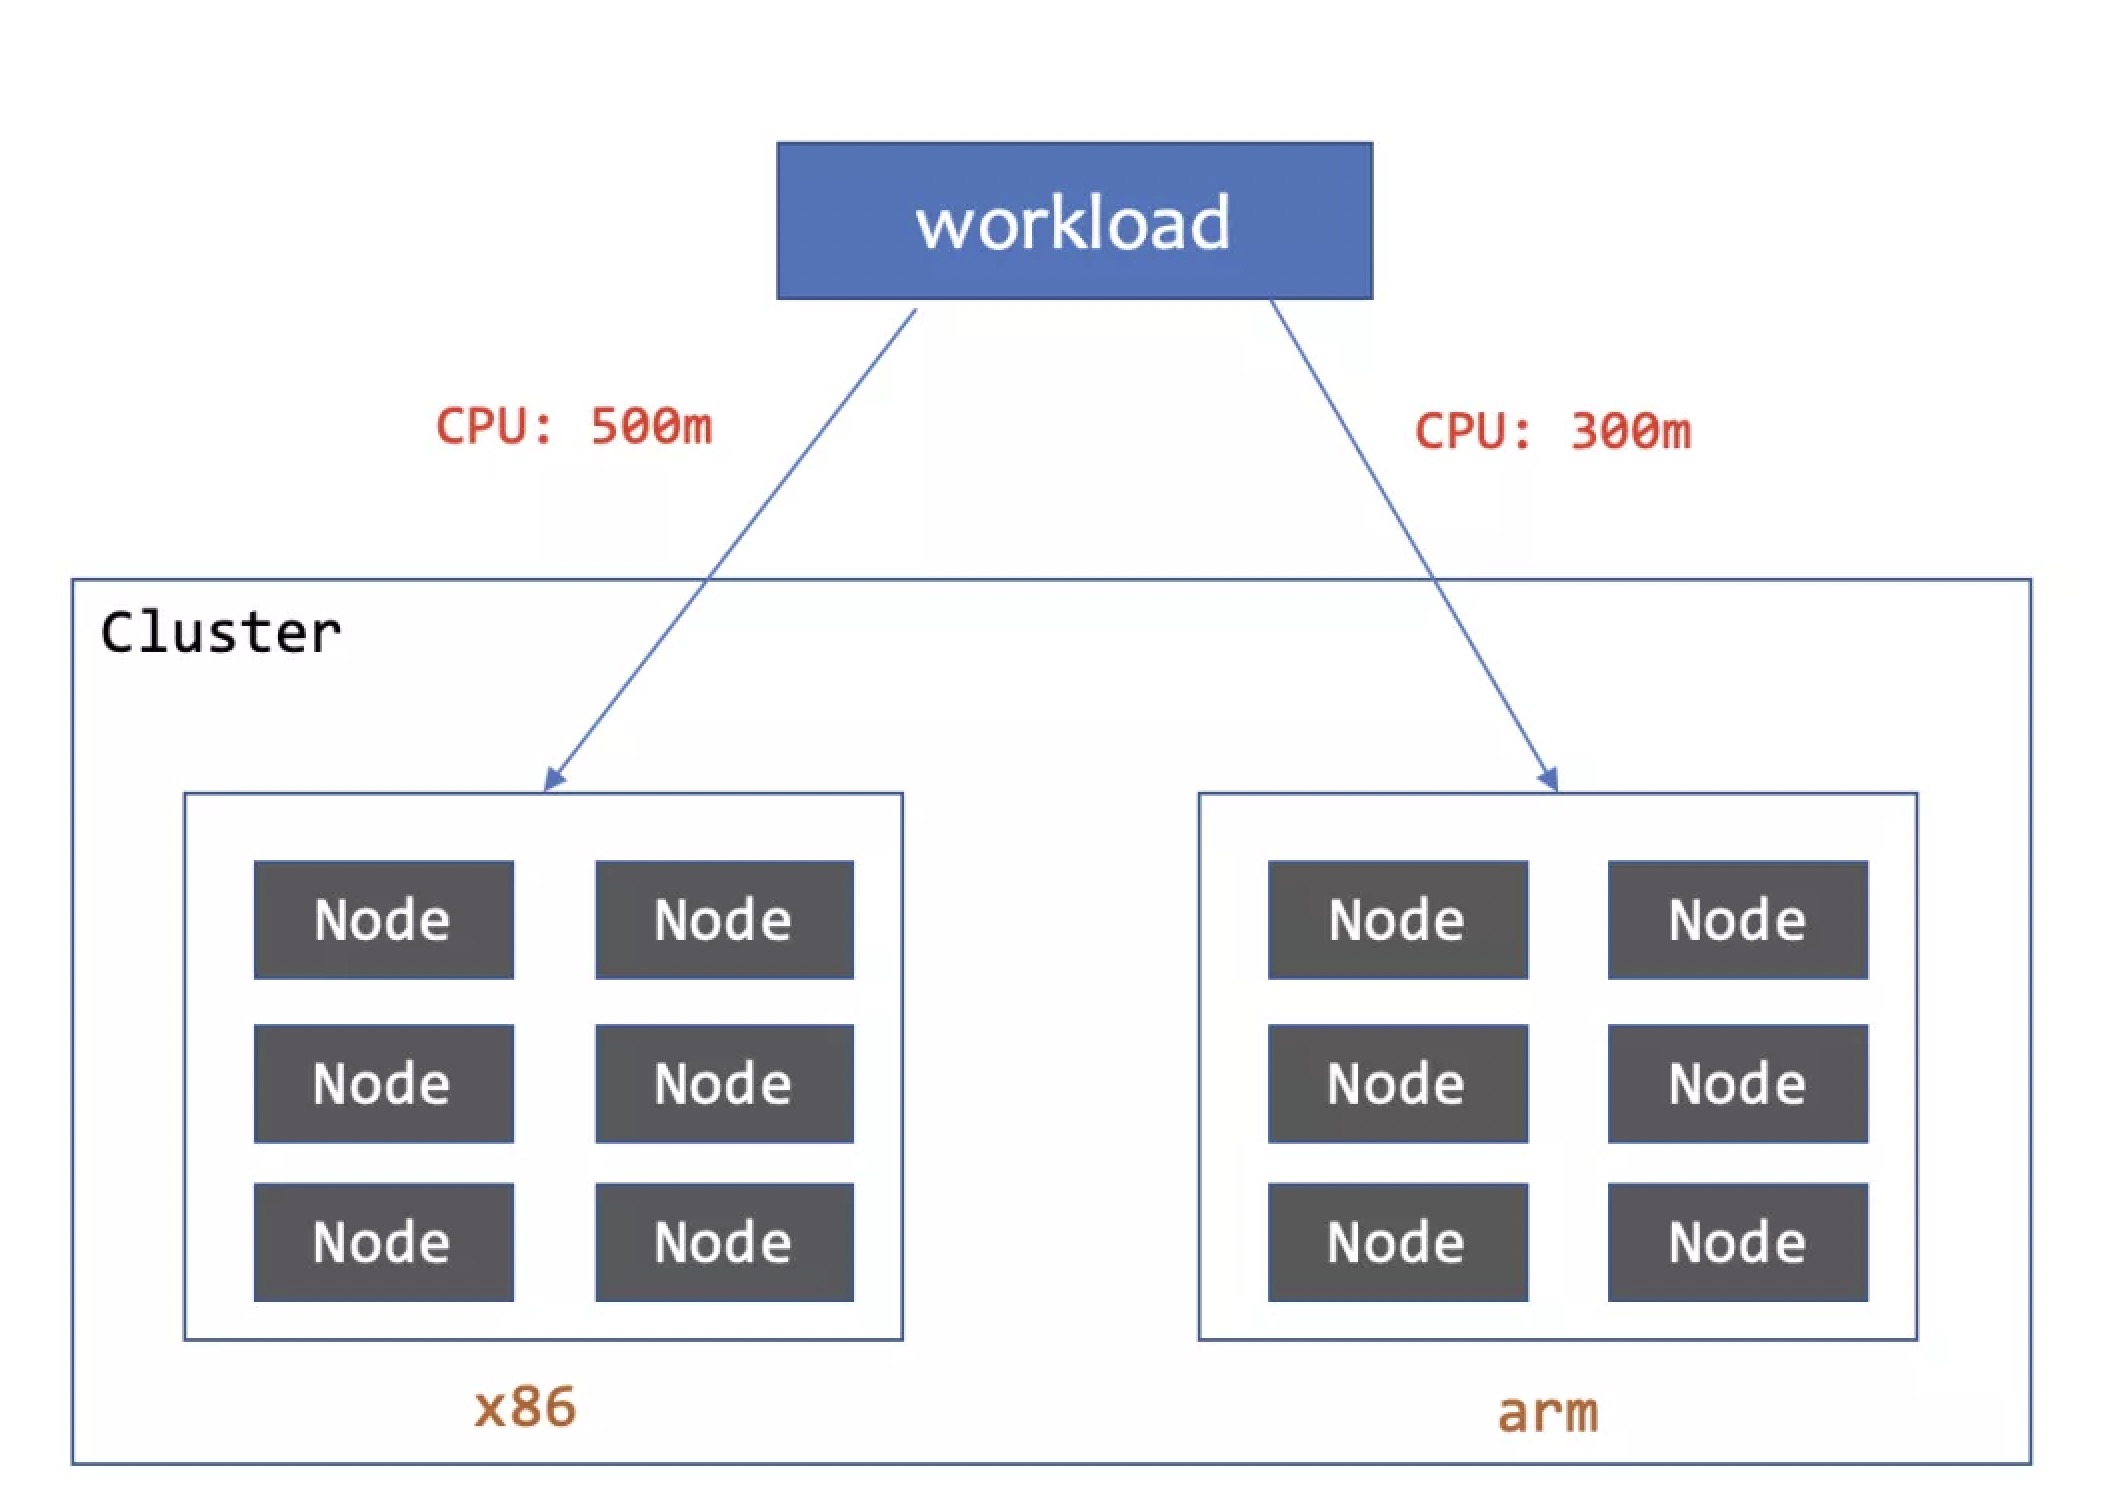
In addition to capacity allocation, UnitedDeployment also allows customizing any Pod Spec fields (including container images) for each subset, which is similar to WorkloadSpread. This grants UnitedDeployment's subset configuration with powerful flexibility.
Adaptive Elasticity
UnitedDeployment offers robust adaptive elasticity, automating scaling and rescheduling operations to reduce operational overhead. It supports Kubernetes Horizontal Pod Autoscaler (HPA), enabling automatic scaling based on predefined conditions while adhering strictly to subset configurations.
UnitedDeployment also offers adaptive Pod rescheduling capabilities similar to WorkloadSpread. Additionally, it allows configuration of timeout durations for scheduling failures and recovery times for subsets from unscheduable status, providing enhanced control over adaptive scheduling.
Limitations of UnitedDeployment
The many advantages of UnitedDeployment stem from its all-in-one management capabilities as an independent workload. However, this also leads to the drawback of higher business transformation intrusiveness. For users' existing application, it is necessary to modify PaaS systems and tools (such as operation and maintenance systems, release systems, etc.) to switch from existing workloads like Deployment and CloneSet to UnitedDeployment.
Case Study 1: Elastic Scaling of Pods to Virtual Nodes with Adaptation for Serverless Containers
Cloud providers typically offer three types of Kubernetes services:
- Managed clusters with fixed nodes using cloud servers purchased by users.
- Serverless clusters delivering container computing power directly via virtual node technology.
- Hybrid clusters containing both managed nodes and virtual nodes.
In this case, a company planned to launch a new service with significant peak-to-valley traffic differences (up to tenfold). To handle this characteristic, they purchased a batch of cloud servers to form a managed cluster nodepool for handling baseline traffic and intended to quickly scale out new replicas to a serverless subset during peak hours. Additionally, their application required extra configuration to run in the Serverless environment. Below is an example configuration:
apiVersion: apps.kruise.io/v1alpha1
kind: UnitedDeployment
metadata:
  name: elastic-app
spec:
  # Omitted business workload template
  ...
  topology:
    # Enable Adaptive scheduling to dispatch Pod replicas to ECS node pools and ACS instances adaptively
    scheduleStrategy:
      type: Adaptive
      adaptive:
        # Start scheduling to ACS Serverless instances 10 seconds after ECS node scheduling failure
        rescheduleCriticalSeconds: 10
    subsets:
      # Prioritize ECS without an upper limit; only schedule to ACS when ECS fails
      # During scale-in, delete ACS instances first, then ECS node pool Pods
      - name: ecs
        nodeSelectorTerm:
          matchExpressions:
            - key: type
              operator: NotIn
              values:
                - acs-virtual-kubelet
      - name: acs-serverless
        nodeSelectorTerm:
          matchExpressions:
            - key: type
              operator: In
              values:
                - acs-virtual-kubelet
          # Use patch to modify environment variables for Pods scheduled to elastic computing power, enabling Serverless mode
        patch:
          spec:
            containers:
              - name: main
                env:
                  - name: APP_RUNTIME_MODE
                    value: SERVERLESS
---
# Combine with HPA for automatic scaling
apiVersion: autoscaling/v2
kind: HorizontalPodAutoscaler
metadata:
  name: elastic-app-hpa
spec:
  minReplicas: 1
  maxReplicas: 100
  metrics:
    - type: Resource
      resource:
        name: cpu
        target:
          type: Utilization
          averageUtilization: 2
  scaleTargetRef:
    apiVersion: apps.kruise.io/v1alpha1
    kind: UnitedDeployment
    name: elastic-app
Case Study 2: Allocating Different Resources to Pods with Different CPU Types
In this case, a company purchased several cloud server instances with Intel, AMD, and ARM platform CPUs to prepare for launching a new service. They wanted Pods scheduled on different platforms to exhibit similar performance. After stress testing, it was found that, compared to Intel CPUs as the benchmark, AMD platforms needed more CPU cores, while ARM platforms required more memory.
apiVersion: apps.kruise.io/v1alpha1
kind: UnitedDeployment
metadata:
  name: my-app
spec:
  replicas: 4
  selector:
    matchLabels:
      app: my-app
  template:
    deploymentTemplate:
      ... # Omitted business workload template
  topology:
    # Intel, AMD, and Yitian 710 ARM machines carry 50%, 25%, and 25% of the replicas respectively
    subsets:
      - name: intel
        replicas: 50%
        nodeSelectorTerm:
          ... # Select Intel node pool through labels
        patch:
          spec:
            containers:
              - name: main
                resources:
                  limits:
                    cpu: 2000m
                    memory: 4000Mi
      - name: amd64
        replicas: 25%
        nodeSelectorTerm:
          ... # Select AMD node pool through labels
        # Allocate more CPU to AMD platform
        patch:
          spec:
            containers:
              - name: main
                resources:
                  limits:
                    cpu: 3000m
                    memory: 4000Mi
      - name: yitian-arm
        replicas: 25%
        nodeSelectorTerm:
          ... # Select ARM node pool through labels
        # Allocate more memory to ARM platform
        patch:
          spec:
            containers:
              - name: main
                resources:
                  limits:
                    cpu: 2000m
                    memory: 6000Mi
Summary
Elastic computing power can significantly reduce business costs and effectively increase the performance ceiling of services. To make good use of elastic computing power, it is necessary to choose appropriate elastic components based on specific application characteristics. The following table summarizes the capabilities of the two components introduced in this article, hoping to provide some reference.
| Component | Partition Principle | Ease of Modification | Granularity of Partition | Elasticity Capability |
|---|---|---|---|---|
| WorkloadSpread | Modify Pods via Webhook | High | Medium | Medium |
| UnitedDeployment | Create multiple workloads via templates | Low | High | High |


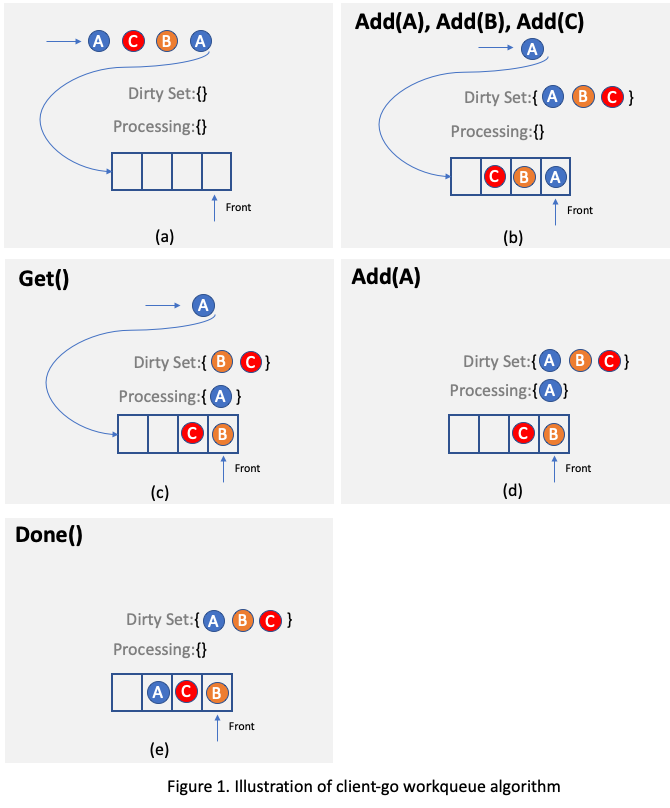
 .... For example, as illustrated in
Figure 2, assuming there is only one reconciling thread and two requests targeting the same object A arrive, one of
them will be processed and object A will be added to the
.... For example, as illustrated in
Figure 2, assuming there is only one reconciling thread and two requests targeting the same object A arrive, one of
them will be processed and object A will be added to the