面向Workload级别的灵活可配置Serverless弹性解决方案

Serverless是云计算的进一步延伸,因此其继承了云计算的最大特点,即按需弹性伸缩。这样的模型设计让开发者无需关注具体的部署资源,充分利用资源规模效应,提供更好的弹性能力,也能让企业切实享受到真正的按需使用特征。正因如此,更多的云厂商们不约而同地转向Serverless这一新的架构设计理念。
“灵活可配置”作为Serverless技术的弹性核心能力之一,所关注的是“通过简单、少侵入、灵活可配置的方法让具体用云场景能充分使用弹性资源”。其本质是解决了容量规划与实际集群负载配置间的矛盾。本文将依次介绍 WorkloadSpread 与 UnitedDeployment 两种资源可配置插件,详细探讨它们的核心能力、技术原理与优劣势,以及在真实场景中的应用。通过这些内容分享 OpenKruise 社区在应对 Serverless 负载弹性问题时的技术演进和思考。
弹性场景概述
随着 Serverless 技术的成熟,越来越多企业倾向于使用弹性资源(如阿里云 ACS 等 Serverless 容器实例)而非静态资源(如由云服务器 组成的托管资源池、自建的 IDC 机房等)来承载具有临时性、潮汐性、突发性等特征的应用,以按需使用的形式提高资源利用效率,降低整体成本。下面列出一些典型的弹性场景:
-
优先使用线下IDC机房的自建资源,当资源不足时,将应用副本扩展到云上承载。
-
优先使用包年包月购买的托管节点资源池,资源不足时使用按量付费的 Serverless 实例承载副本。
-
优先使用持有的高质量稳定算力(如独享型的云服务器实例),用完后再使用较低质量的算力(如 Spot 实例)。
-
为部署到不同算力形式(如 X86 架构、ARM 架构、Serverless 实例等)上的容器副本配置不同的资源量,以获得相似的性能表现。
-
为部署到节点上与 Serverless 环境的副本注入不同的中间件配置(如节点上副本使用共享 Daemon,Serverless 副本注入 Sidecar)
本文介绍的两种组件,在解决上述问题,具有各自的优势场景。用户可以根据自身实际场景选择合适的能力来用好弹性算力。
两种组件的能力及其优势场景概述
-
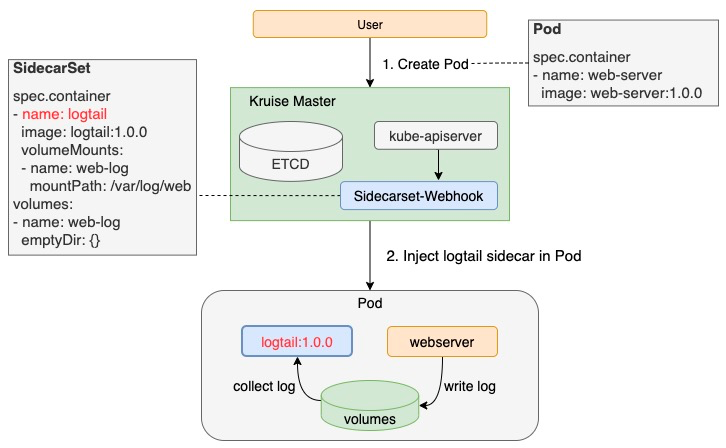
WorkloadSpread:通过 Webhook 工作机制拦截符合条件的 Pod 创建请求,并对其执行 Patch 操作完成差异化配置注入。适合需要将资源划分为多个弹性分区,并为各分区内 Pod 的 Metadata、Spec 等字段进行自定义配置的现存业务。
-
UnitedDeployment:一种原生支持弹性分区与 Pod 自定义配置的工作负载,具有比 WorkloadSpread 更强的弹性与容量规划能力,适合需要划分多个弹性分区并为各个分区单独进行配置的新业务。
WorkloadSpread:基于 Pod Webhook 的弹性策略插件
WorkloadSpread 是由 OpenKruise 社区提供的一个旁路组件,能够根据特定规则将目标工作负载的 Pod 分布到不同类型的节点上,从而赋予原始工作负载多区域部署和弹性部署的能力。 WorkloadSpread 支持几乎所有原生或自定义的工作负载类型。能够在避免对原始工作负载的直接修改的同时,增强了工作负载在多种环境中的适应性和灵活性,使其能够更好地应对不同的部署需求和运行条件。 下面是一个典型 WorkloadSpread 示例:
apiVersion: apps.kruise.io/v1alpha1
kind: WorkloadSpread
metadata:
  name: workloadspread-demo
spec:
  targetRef: # WorkloadSpread 同时支持 K8S 原生与 Kruise 工作负载
    apiVersion: apps/v1 | apps.kruise.io/v1alpha1
    kind: Deployment | CloneSet
    name: workload-xxx
  subsets:
    - name: subset-a
      # 前三个副本调度到该 Subset 中
      maxReplicas: 3
      # Pod 的亲和性配置
      requiredNodeSelectorTerm:
        matchExpressions:
          - key: topology.kubernetes.io/zone
            operator: In
            values:
              - zone-a
      patch:
        # 为调度到该 Subset 中的 Pod 额外注入一个自定义 Label
        metadata:
          labels:
            xxx-specific-label: xxx
    - name: subset-b
      # 弹性 Subset 部署到 Serverless 集群,不配置容量,副本数不设上限
      requiredNodeSelectorTerm:
        matchExpressions:
          - key: topology.kubernetes.io/zone
            operator: In
            values:
              - acs-cn-hangzhou
  scheduleStrategy:
    # 调度策略,Adaptive 模式会将调度失败的 Pod 重新调度到其他 Subset
    type: Adaptive | Fixed
    adaptive:
      rescheduleCriticalSeconds: 30
强大的分区能力
WorkloadSpread 通过 Subsets 来划分不同的弹性分区,按照 Subsets 顺序正向扩容、逆向缩容。
灵活的调度配置
在 Subset 层面,WorkloadSpread 不仅支持通过 Label 选定节点,还支持细致地自定义 Subset 中 Pod 的污点与容忍度配置。
例如,通过 requiredNodeSelectorTerm字段可以指定必须满足的节点属性、通过 preferredNodeSelectorTerms 字段设置优选的节点属性、以及通过
tolerations字段配置 Pod 对节点污点的容忍度。
这些高级配置选项使得 WorkloadSpread 能够更加精准地控制 Pod 的调度和分布,从而满足各种复杂的部署需求。
在全局层面,WorkloadSpread 支持通过scheduleStrategy字段配置两种不同的调度策略:Fixed 与 Adaptive。Fixed 策略确保 Pod
严格按照预定义的 Subsets 进行分布,即使因为各种原因调度失败。
这对于需要精确控制工作负载分布的场景非常有用。而 Adaptive 策略则提供了更高的灵活性,当某个 Subset 无法满足调度需求时,Pod
可以自动重新调度到其他有可用容量的 Subset 上,从而提高系统的弹性和可靠性。
通过强大且高效的调度策略,WorkloadSpread 能够在复杂的弹性业务场景中确保 Pod 在不同的弹性分区之间实现灵活且均衡的分配。
细致的 Pod 定制配置方式
在 WorkloadSpread 的 subset 配置中,可以通过 patch 字段对调度到该分区的 Pod 进行细致的自定义。几乎所有 Pod 中支持 patch 操作的字段都可以进行修改。 这些字段包括但不限于容器镜像、资源限制、环境变量、卷挂载、启动命令、探针配置和标签等。通过 Pod 字段的精细化定制,Pod 的基本规格(在目标工作负载模板中定义)与环境适配(在 subset 的 patch 字段中定义)实现了有效解耦,从而使得工作负载能够灵活地适配各种不同的分区环境。下面是一些常用的自定义示例:
...
# patch pod with a topology label:
patch:
  metadata:
    labels:
      topology.application.deploy/zone: "zone-a"
...
以上片段展示了如何对 Subset 中的所有 Pod 添加或修改一个 Label。
...
# patch pod container resources:
patch:
  spec:
    containers:
      - name: main
        resources:
          limit:
            cpu: "2"
            memory: 800Mi
...
以上片段展示了如何修改一个 Subset 中 Pod 的资源。
...
# patch pod container env with a zone name:
patch:
  spec:
    containers:
      - name: main
        env:
          - name: K8S_AZ_NAME
            value: zone-a
...
以上片段展示了如何修改一个 Subset 中 Pod 的环境变量。
WorkloadSpread 的 Pod Webhook 工作原理
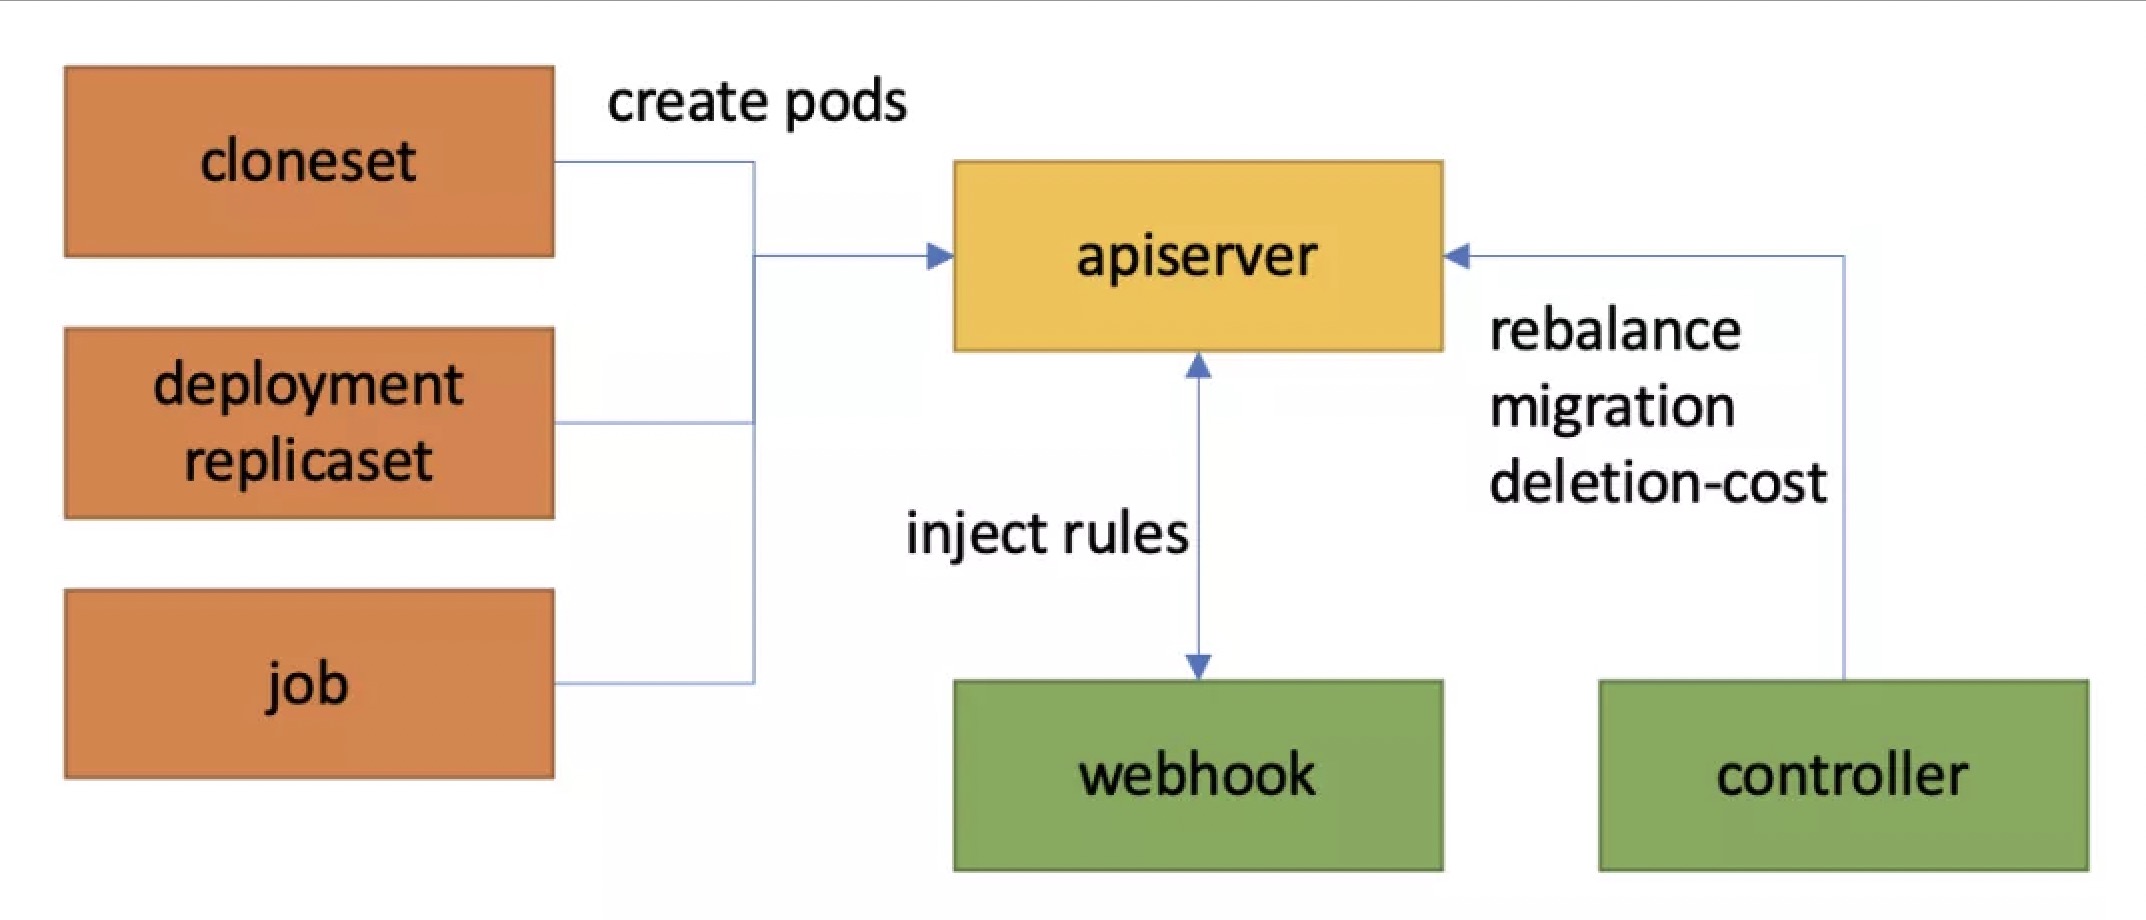
WorkloadSpread 通过 Pod Webhook 直接作用于目标工作负载所创建的 Pod 而非工作负载本身,因此扩缩容操作依然通过操作目标工作负载的 replicas 进行。相比之下,ElasticWorkload 对原有业务的侵入性较大,而 WorkloadSpread 则因为完全不操作目标工作负载、所有功能都由单独的控制器与 Webhook 直接作用于 Pod,因而具有更高的内聚性。
当符合条件的 Pod 创建时,WorkloadSpread 的 Pod Webhook 会将其拦截,并读取相应的 WorkloadSpread 配置。Webhook 会按照扩容顺序,从配置中根据容量情况选择一个合适的 subset 分配给该 Pod,并依据 subset 中定义的调度信息和自定义信息修改 Pod 的配置。同时,控制器还会维护所有相关 Pod 的 controller.kubernetes.io/pod-deletion-cost 标签,从而确保缩容顺序的正确性。
WorkloadSpread 存在的不足方面
WorkloadSpread 在设计上涉及到多个不耦合的组件,并且执行过程较为松散,因此其存在一些不足之处。
Webhook 的潜在风险
WorkloadSpread 依赖 Pod Webhook 来实现其功能,因此它会拦截集群中所有 Pod 的创建请求。当运行 Webhook 的 Pod(即 kruise-manager)性能不足或发生故障时,可能会导致整个集群无法创建新的 Pod。此外,当集群在短时间内需要进行大量的扩缩容操作时,Webhook 也可能会成为性能瓶颈。
作用于 Pod 的局限性
尽管通过 Webhook 直接作用于 Pod 可以减少对用户业务的侵入,但这种方法也引入了一些局限性。例如,对于 CloneSet 而言,它只能通过 partition 字段来控制整个集群内灰度升级的比例,而无法精细地控制每个 subset 中的灰度比例。同样地,WorkloadSpread 的设计注定了其无法将工作负载级别的能力应用到每个 subset 中。
客户案例1:大规模压测场景下进行带宽包分配
该案例中,客户需要在某购物节大促前对线上系统进行压测。为此,客户开发了一个 load-agent 程序用于产生请求,并通过一个 CloneSet 管理 agent 的副本数来控制压测流量大小。在对业务场景进行分析后,客户判断压测需要 3000 个 agent 副本。为了节省成本,客户向云服务商购买了 10 个 200M 的共享带宽包实例(每个共享带宽包可以供300个Pod使用),期望将其动态地分配给弹性伸缩的 agent 副本。
考虑到模拟请求的 CloneSet 是通过客户的压测系统发布与动态伸缩的,不适合重建,因而客户选择给 CloneSet 外挂 WorkloadSpread 来实现带宽包的分配。具体地,客户在压测集群中创建了一个指向上述 CloneSet 的 WorkloadSpread,它包含 11 个 Subset:前 10 个 Subset 的容量为 300,并通过 patch 修改了 Pod 的 Annotations 用于绑定具体的带宽包;最后一个 Subset 没有容量,不指定带宽包,用于阻止万一创建超过 3000 个副本后额外的带宽分配。
apiVersion: apps.kruise.io/v1alpha1
kind: WorkloadSpread
metadata:
  name: bandwidth-spread
  namespace: loadtest
spec:
  targetRef:
    apiVersion: apps.kruise.io/v1alpha1
    kind: CloneSet
    name: load-agent-XXXXX
  subsets:
    - name: bandwidthPackage-1
      maxReplicas: 300
      patch:
        metadata:
          annotations:
            k8s.aliyun.com/eip-common-bandwidth-package-id: <id1>

    - ...

    - name: bandwidthPackage-10
      maxReplicas: 300
      patch:
        metadata:
          annotations:
            k8s.aliyun.com/eip-common-bandwidth-package-id: <id10>
    - name: no-eip
客户案例2:为托管 K8S 集群中的服务弹性扩容到 Serverless 实例提供兼容性
该案例中,客户有一个运行于私有云的服务。由于业务发展需要扩容更多的算力,但是暂时无法扩建线下机房,因此选择使用虚拟节点能力接入云上的 Serverless 弹性算力组成混合云。客户的应用使用了一些加速服务(如 Fluid ),这些服务组件在私有云中通过 DaemonSet 等方式预先部署在了节点上提供服务;但是在云上没有部署基础服务,因而需要为 Pod 额外注入一个 sidecar 来提供加速能力。
客户诉求在现有业务扩容上云的过程中,不能变动原有工作负载(Deployment)的 8 个副本,仅对云上 Pod 的配置做修订。客户通过
WorkloadSpread 给扩容到不同 Subset 的 Pod 分别
打上了用于控制是否注入 Fluid Sidecar 的标签 serverless.fluid.io/inject,以在 Serverless 实例中注入 Sidecar。相关示例如下:
apiVersion: apps.kruise.io/v1alpha1
kind: WorkloadSpread
metadata:
  name: data-processor-spread
spec:
  targetRef:
    apiVersion: apps/v1
    kind: Deployment
    name: data-processor
  subsets:
    - name: local
      maxReplicas: 8
      patch:
        metadata:
          labels:
            serverless.fluid.io/inject: "false"
    - name: aliyun-acs
      patch:
        metadata:
          labels:
            serverless.fluid.io/inject: "true"
UnitedDeployment:原生具备 Serverless 弹性能力的工作负载
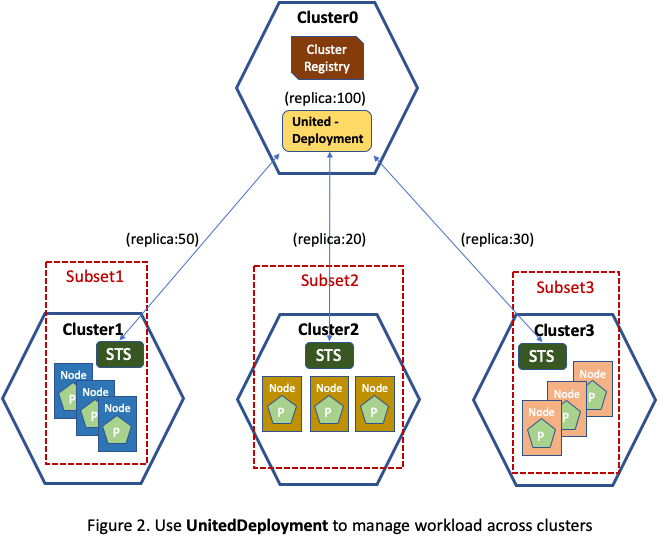
UnitedDeployment 是 OpenKruise 社区提供的一种原生支持分区管理的轻量化高级工作负载。与 ElasticWorkload 和 WorkloadSpread 对基础工作负载进行增强的设计理念不同,UnitedDeployment 提供了一种全新的模式来管理分区弹性应用。UnitedDeployment 资源通过一个模板来定义应用,控制器则通过创建并管理多个次级工作负载来匹配不同的分区。UnitedDeployment 最显著的特征在于,它作为一个一体化的弹性负载,在单个资源中同时完成应用定义、分区定义、容量管理、扩缩容和应用升级等应用全生命周期管理。以下是一个典型的 UnitedDeployment 资源示例:
apiVersion: apps.kruise.io/v1alpha1
kind: UnitedDeployment
metadata:
  name: sample-ud
spec:
  replicas: 6
  selector:
    matchLabels:
      app: sample
  template:
    # UnitedDeployment 会通过此模板为每个分区创建一个 CloneSet
    cloneSetTemplate:
      metadata:
        labels:
          app: sample
      spec:
        # CloneSet Spec
        ...
  topology:
    subsets:
      - name: ecs
        # 该分区的副本调度到具有标签 ecs 的托管节点池上
        nodeSelectorTerm:
          matchExpressions:
            - key: node
              operator: In
              values:
                - ecs
        # 该分区最多有两个副本
        maxReplicas: 2
      - name: acs-serverless
        # acs 弹性分区副本数无限
        nodeSelectorTerm:
          matchExpressions:
            - key: node
              operator: In
              values:
                - acs-virtual-kubelet
UnitedDeployment 的优势
一站式弹性应用管理
UnitedDeployment 的一站式应用管理体现在只需要使用一个资源就可以完成应用的定义、分区、扩缩容、升级等操作。
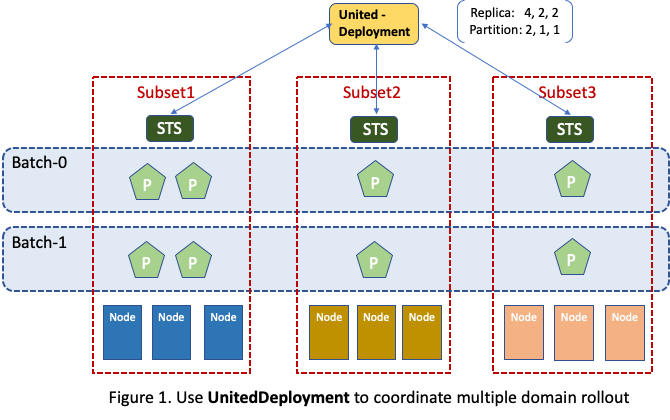
UnitedDeployment 控制器会根据工作负载模板,为每个分区管理一个对应类型的次级工作负载,这些次级工作负载无需用户额外关注。在上图中,用户只需要管理蓝色的应用与分区,UnitedDeployment 控制器则会根据全局配置完成后续对各个次级工作负载的管理工作,包括创建、修改、删除等。除了直接对次级工作负载的管理,在必要时,控制器还会监控这些工作负载创建的 Pod 状态以进行相应的调整。由于所有相关的资源全都由控制器直接管理,资源的操作的发生时机是可控的。因此,UnitedDeployment 控制器总能获取相关资源的正确信息,并在正确的时机对其进行操作,而不会发生一致性问题。
用户在 UnitedDeployment 资源中配置的副本数将会被控制器适当地分配到各个次级工作负载上,由工作负载控制器实施具体的扩缩容操作。因此, 使用 UnitedDeployment 的扩缩容与直接使用对应的工作负载扩缩容产生完全相同的效果,用户不需要额外学习。
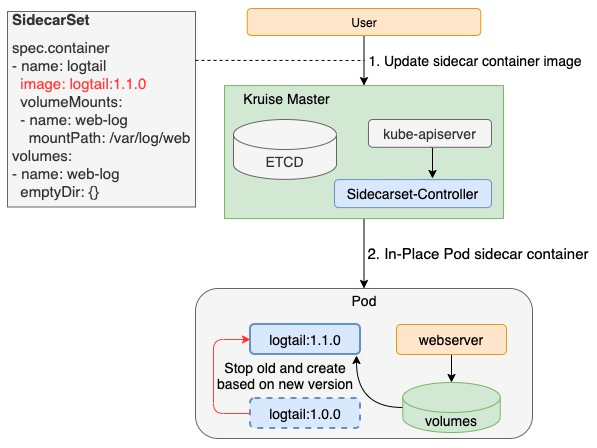
得益于对次级工作负载的直接管理,UnitedDeployment 具备了对应用进行更新和升级的能力。当工作负载模板中的配置发生任何变更时,这些变更将被同步到相应的次级工作负载中,并由工作负载控制器执行具体的升级逻辑。这意味着,例如 CloneSet 的原地升级等特性可以在各个分区内正常生效。此外,如果分区内的次级工作负载支持灰度升级特性,UnitedDeployment 还能够统一它们的 partition 字段值,从而实现各分区之间更细致的灰度控制。
细致的分区配置
UnitedDeployment 内置了两种容量分配算法,让用户可以通过细致的分区容量配置来应对弹性应用的各种场景。
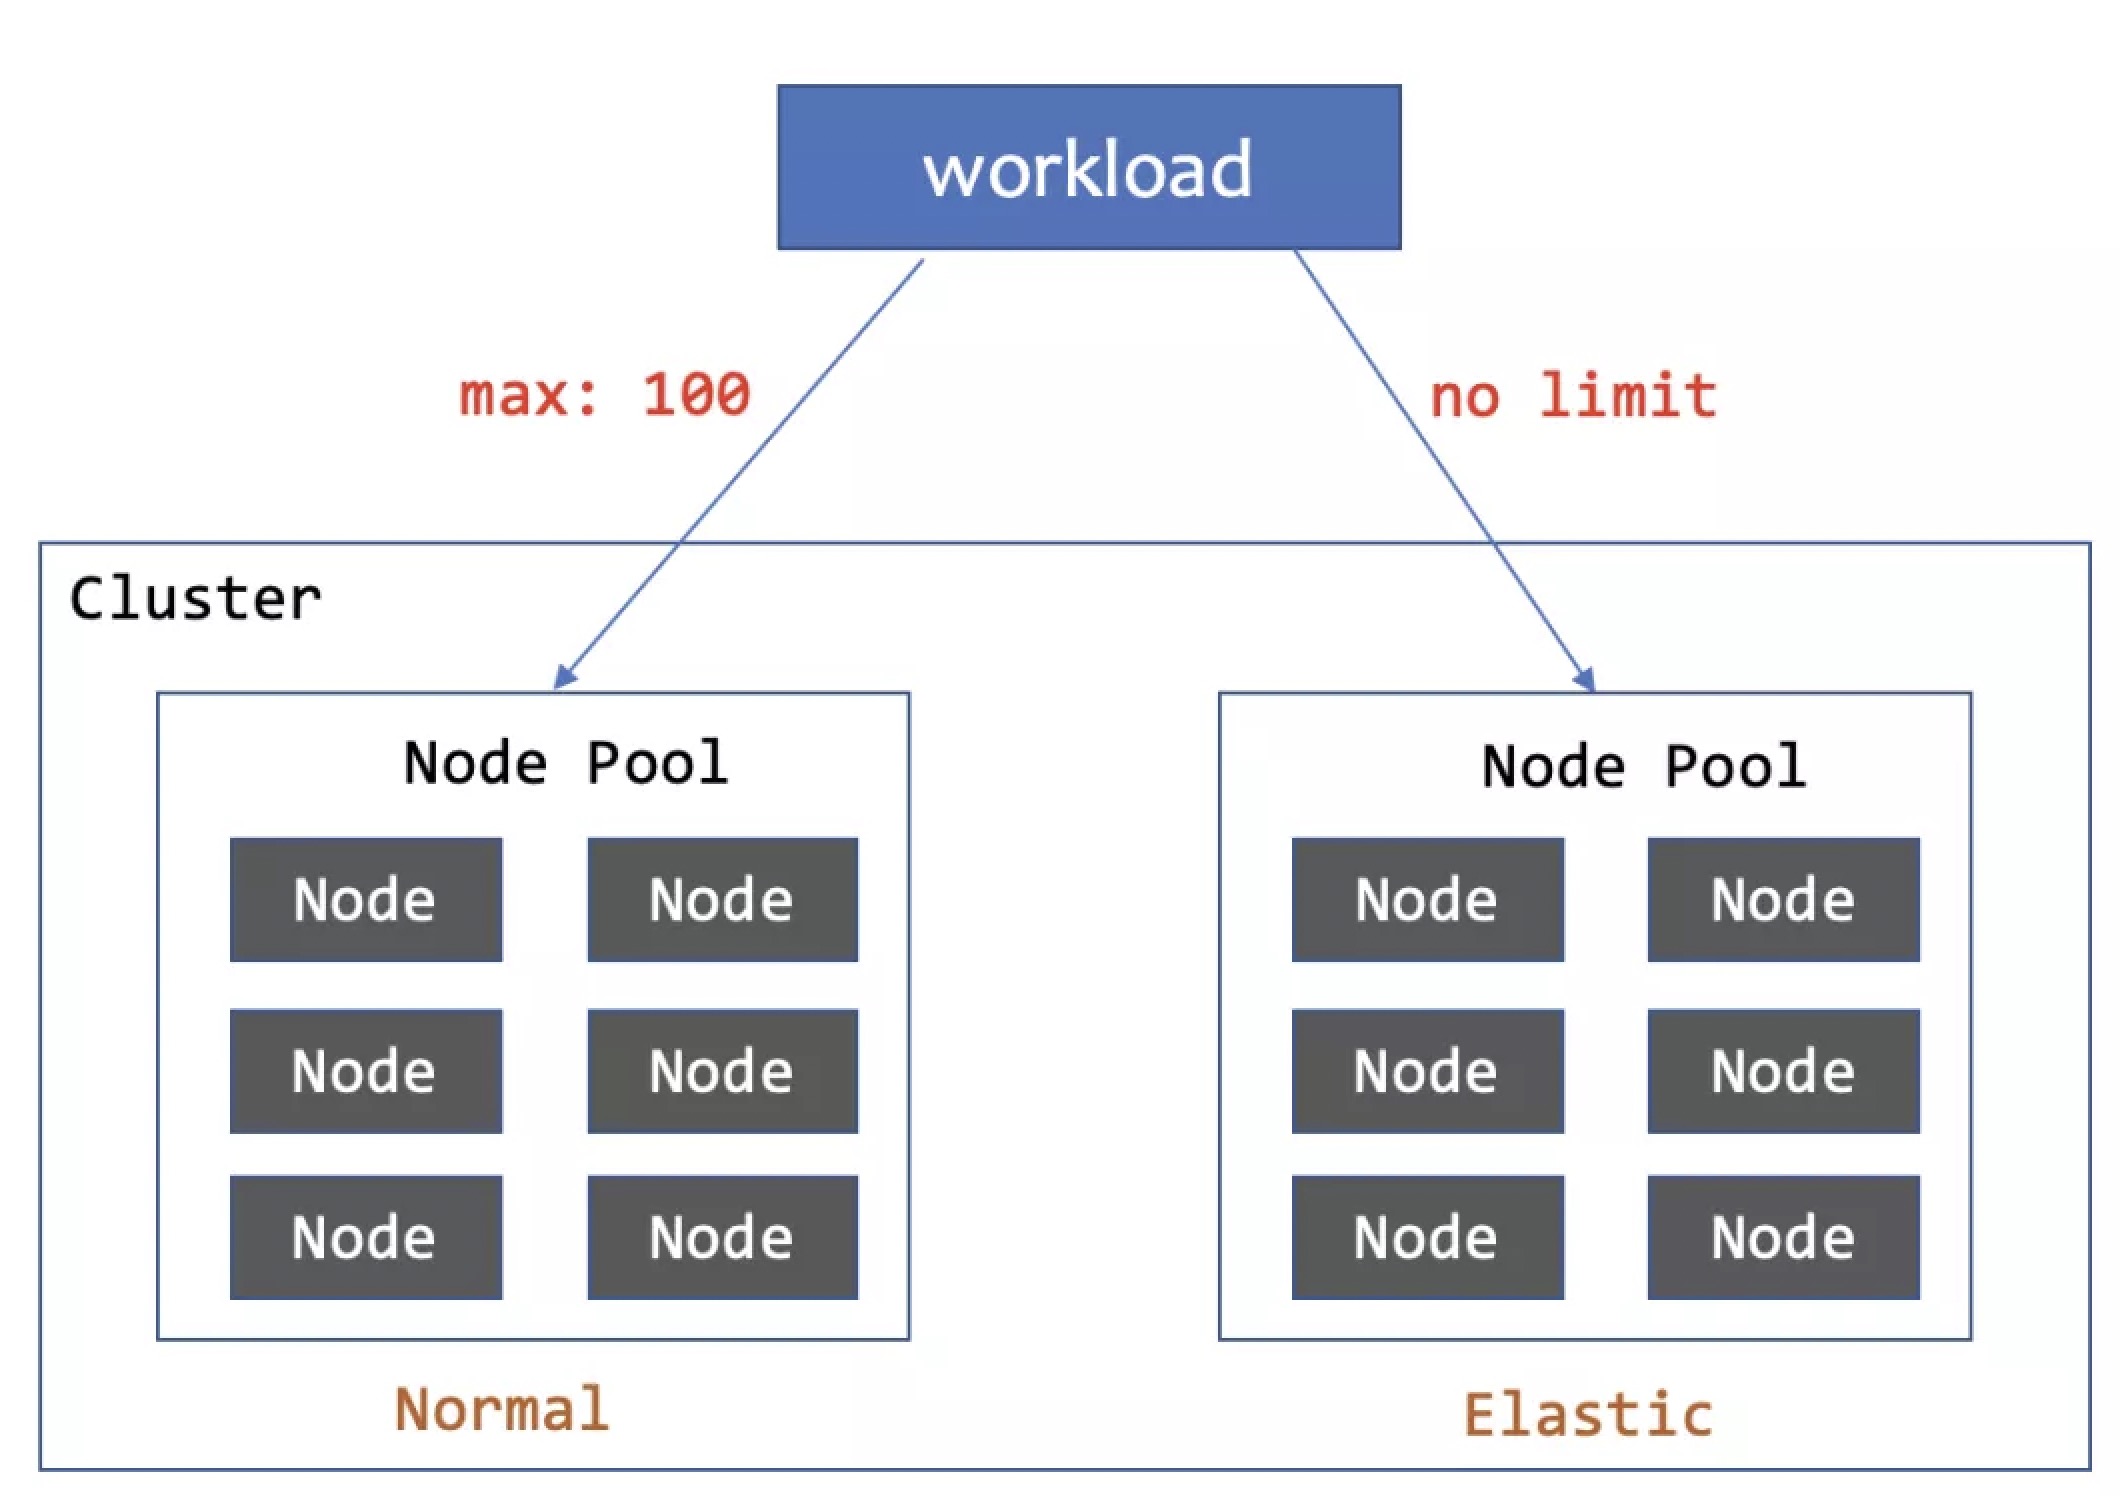
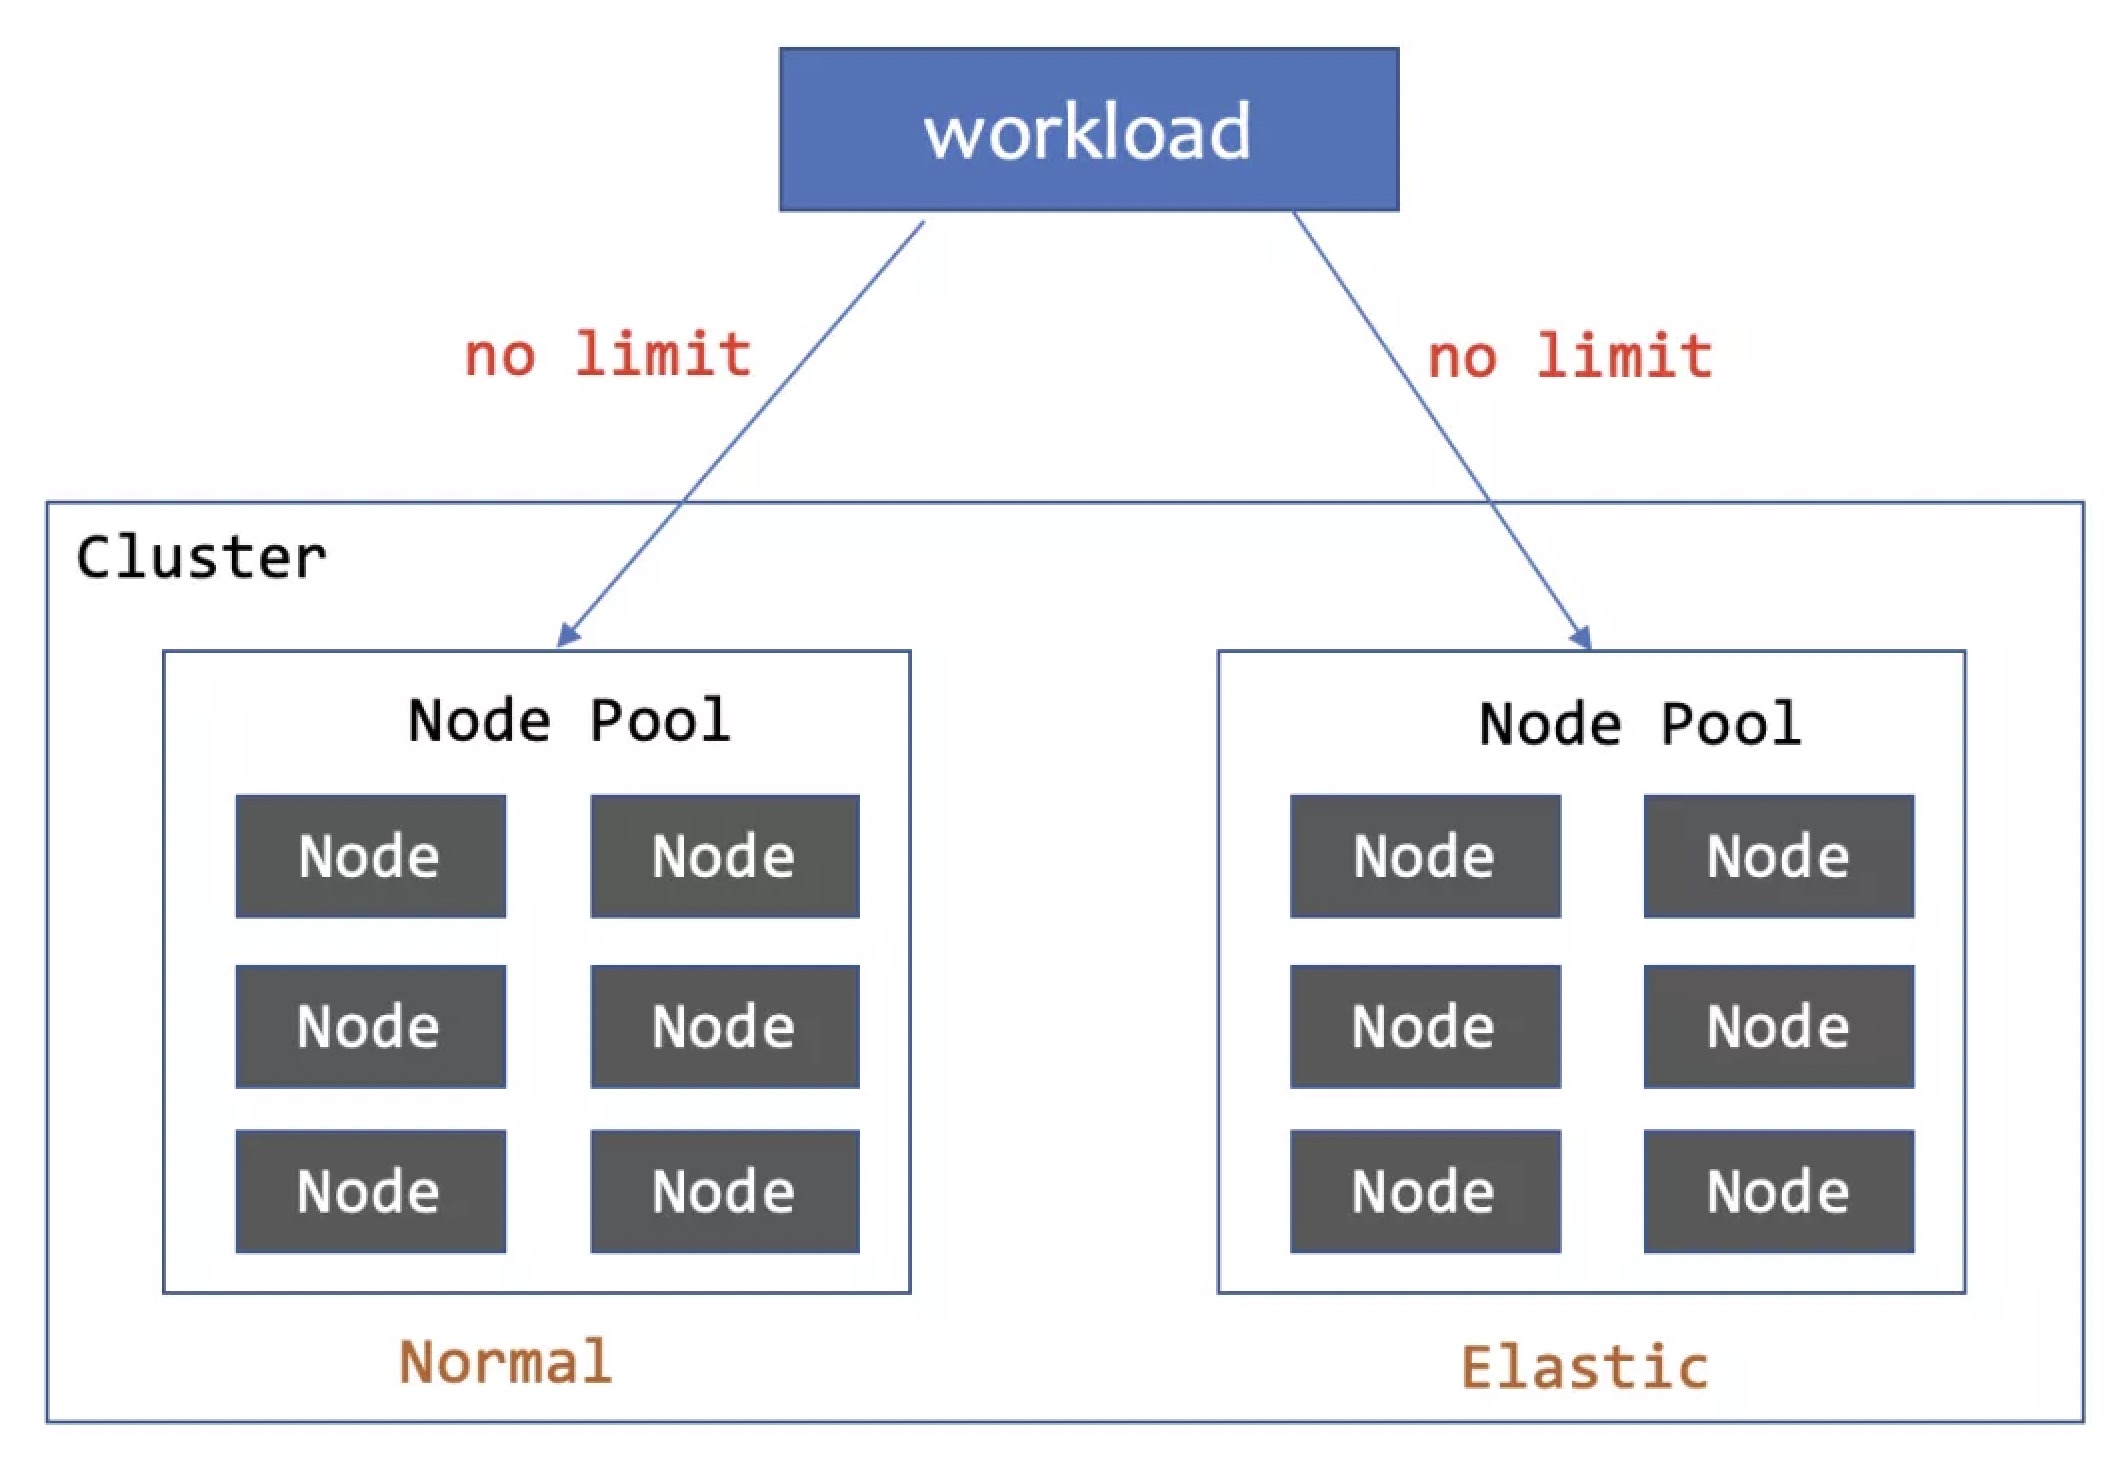
弹性分配算法实现了与 ElasticWorkload、WorkloadSpread 类似的经典弹性容量分配方式:通过为每个分区设定容量的上下限,让 Pod 按照分区的定义顺序正序扩容、逆序缩容。这种方法上文已经进行了充分介绍,此处不再赘述。
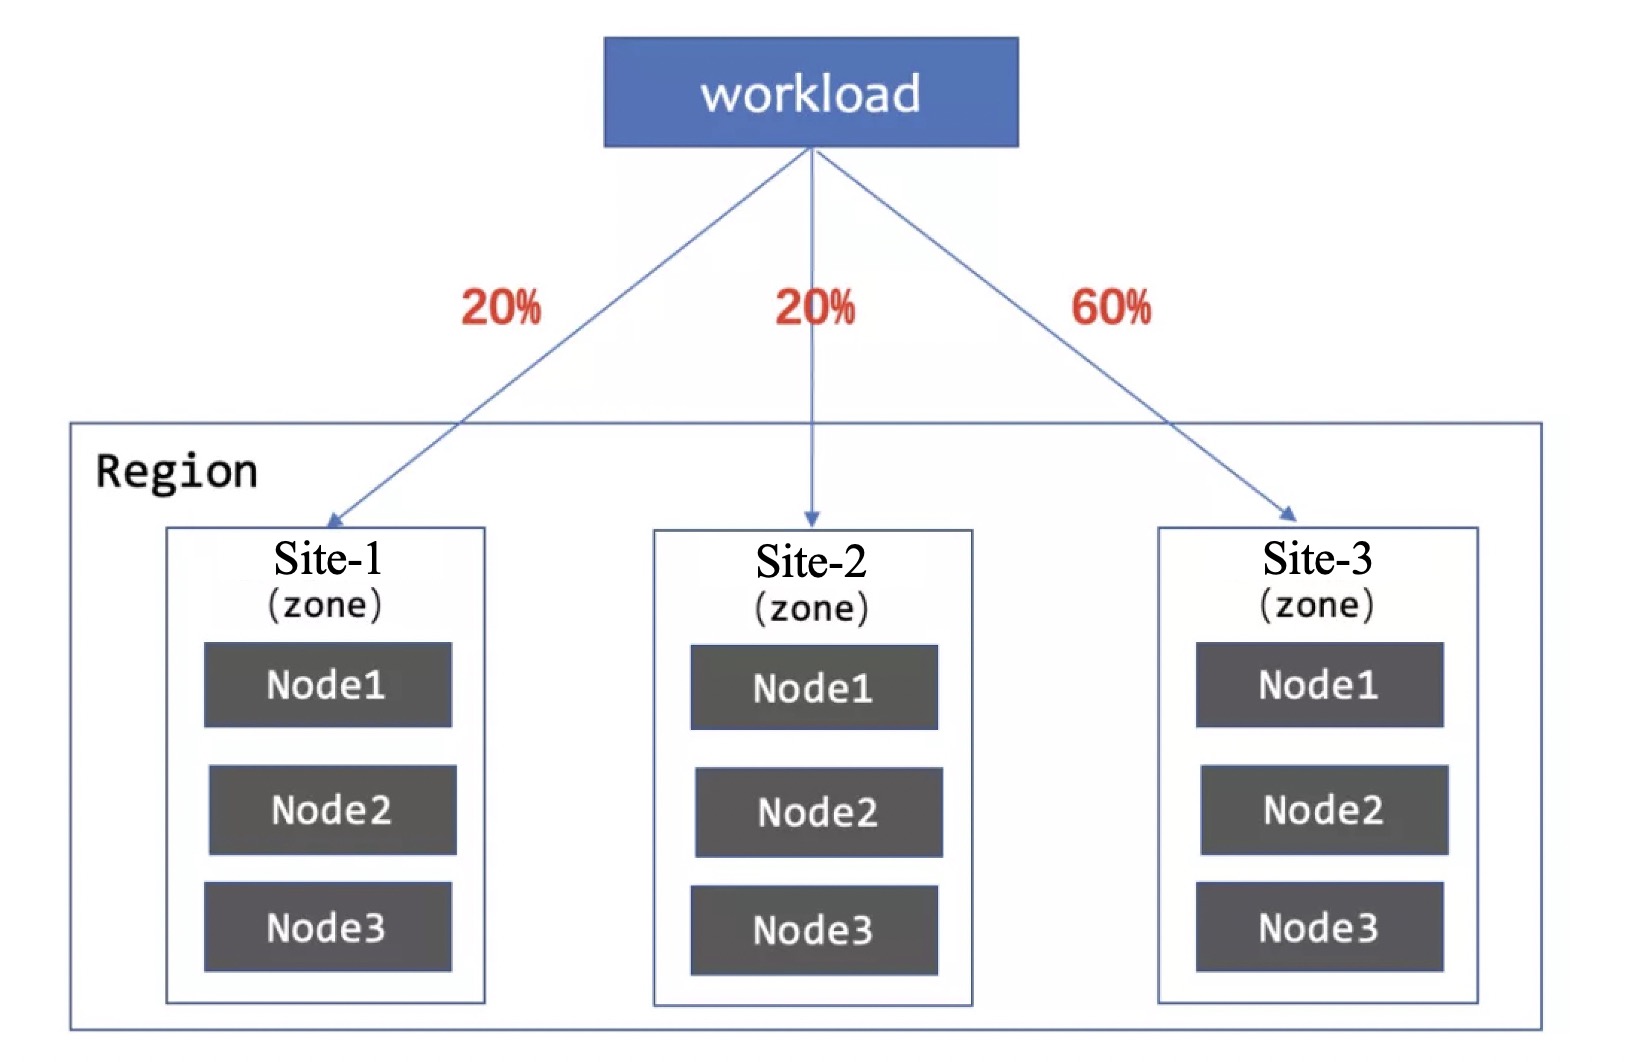
指定分配算法则是一种新的容量分配方式。这种方式通过固定数值或百分比直接为部分分区指定容量,并预留至少一个弹性分区用于平摊剩余的副本。指定分配算法可以适配一些传统弹性分配算法无法应对的场景。比如:固定容量适合管控节点、入口网关等组件;百分比容量则适合将核心副本分散到不同地域节点,并预留一些突发弹性资源。
除了容量分配,UnitedDeployment 还允许为每个分区分别配置 Pod 的任何 Spec 字段(包括容器镜像, Image),这为 UnitedDeployment 的分区配置赋予了更为强大的灵活性:理论上甚至可以使用一个 UnitedDeployment 管理部署一整套微服务应用或是大模型推理管线(不推荐这么做)。
自适应弹性能力
UnitedDeployment 具备强大的自适应弹性能力,能够自动地完成扩缩容和重调度等操作,而无需用户过多关注,降低运维成本。
UnitedDeployment 支持 Kubernetes 的水平自动扩展(HPA),能够根据预先配置的条件自动地进行扩缩容操作——这些操作依然严格遵循分区配置。通过 HPA,应用在某个分区资源即将耗尽时,能够自动向其他分区扩容,实现自动伸缩,从而提高资源利用率。
UnitedDeployment 还具有自适应 Pod 重调度能力。当控制器发现某个分区中存在一些由于各种原因调度失败而长时间处于 Pending 状态的 Pod 时,会将其重新调度到其他分区,以确保可用 Pod 副本的数量,并且依旧遵循分区配置的容量分配策略。在扩容过程中,控制器会避免将 Pod 分配到不可调度的分区中,即使该分区还有剩余容量。**用户能够配置调度失败的超时时间以及分区从不可用状态中恢复的时间,从而更好地对自适应调度能力进行控制。 **
得益于 UnitedDeployment 强大的自适应能力,用户在使用该组件时可以仅进行分区划分,而不必详细规划每个分区的容量。控制器将自动在不同的分区间分配副本数量,无需用户干预。
UnitedDeployment 的三级负载模式
UnitedDeployment 包含了三个级别的工作负载。UnitedDeployment 自身作为一级负载,包含负载模板、分区配置以及副本数量。控制器会为每个分区(Subset)创建并管理一个次级工作负载。
这些次级工作负载是 UnitedDeployment 中负载模板应用于对应分区配置(如调度策略、计算后的副本数、Pod 自定义等)后生成的具体实例。这些次级工作负载实例的控制器(如 Deployment、CloneSet、StatefulSet 等)将会管理作为三级负载的 Pod。
三级工作负载的模式使得 UnitedDeployment 不直接管理 Pod,而是能够复用次级工作负载的各种能力。未来,随着 UnitedDeployment 支持更多次级负载类型,其功能也将得到进一步扩展,从而支持更多、更复杂的弹性场景。
UnitedDeployment 存在的不足之处
UnitedDeployment 的许多优势均源自其作为一个独立工作负载所具备的一站式管理能力,但这也导致了其具有业务改造侵入性较高的不足。对于用户的现有业务,需要对上层平台(运维系统、发布系统等)进行改造,以便从现有的 Deployment、CloneSet 等工作负载切换到 UnitedDeployment。
客户案例1:K8S 集群中, Pod 弹性扩展到 ACS 实例,并针对 Serverless 容器做适配
现在的云服务商提供的 K8S 服务大致上可以分为以下三种:
- 用户购买云服务器作为固定节点的托管集群
- 通过虚拟节点技术直接交付容器算力的 Serverless 集群
- 同时包含托管节点与虚拟节点的混合集群
该案例中,客户准备上线一个新的业务,该业务预计具有很明显的峰谷:在高峰期与低谷期流量有数十倍的差距。为了应对这种业务特性,客户选择采购了一批 ECS 组成 托管集群用于承载基础流量,并在业务高峰期到来时快速地将新的副本弹性扩容到 ACS 中。同时,客户的应用程序具有一定的特殊性,在 Serverless 环境需要做一些额外的配置才能运行。
客户对这个新业务的工作负载的诉求是,保证优先用完 ECS 资源的前提下,通过 HPA 自动地弹性伸缩,同时针对不同的环境注入不同的环境变量。对于这种比较复杂的弹性应用场景,UnitedDeployment 比较符合需求。其中一个配置的实例如下:
apiVersion: apps.kruise.io/v1alpha1
kind: UnitedDeployment
metadata:
  name: elastic-app
spec:
  # 省略业务的工作负载模板
  ...
  topology:
    # 启动 Adaptive 调度,自适应地将 Pod 副本调度到 ECS 节点池与 ACS 实例
    scheduleStrategy:
      type: Adaptive
      adaptive:
        # ECS 节点调度失败 10 秒后开始调度到 ACS Serverless 实例
        rescheduleCriticalSeconds: 10
        # 上述调度失败后 1 小时内不再调度到 ECS 节点
        unschedulableLastSeconds: 3600
    subsets:
      # 优先调度 ECS 并不设上限,直到调度失败才将 Pod 调度到 ACS
      # 缩容时,先删除 ACS 实例,之后再删除 ECS 节点池中的 Pod
      - name: ecs
        nodeSelectorTerm:
          matchExpressions:
            - key: type
              operator: NotIn
              values:
                - acs-virtual-kubelet
      - name: acs-serverless
        nodeSelectorTerm:
          matchExpressions:
            - key: type
              operator: In
              values:
                - acs-virtual-kubelet
          # 通过 patch 修改调度到弹性算力的 Pod 环境变量,启用应用的 Serverless 模式
        patch:
          spec:
            containers:
              - name: main
                env:
                  - name: APP_RUNTIME_MODE
                    value: SERVERLESS
---
# 结合 HPA 自动扩缩容
apiVersion: autoscaling/v2beta1
kind: HorizontalPodAutoscaler
metadata:
  name: elastic-app-hpa
spec:
  minReplicas: 1
  maxReplicas: 100
  metrics:
    - resource:
        name: cpu
        targetAverageUtilization: 2
      type: Resource
  scaleTargetRef:
    apiVersion: apps.kruise.io/v1alpha1
    kind: UnitedDeployment
    name: elastic-app
客户案例2:为调度到不同架构 ECS 上的 Pod 分配不同的资源
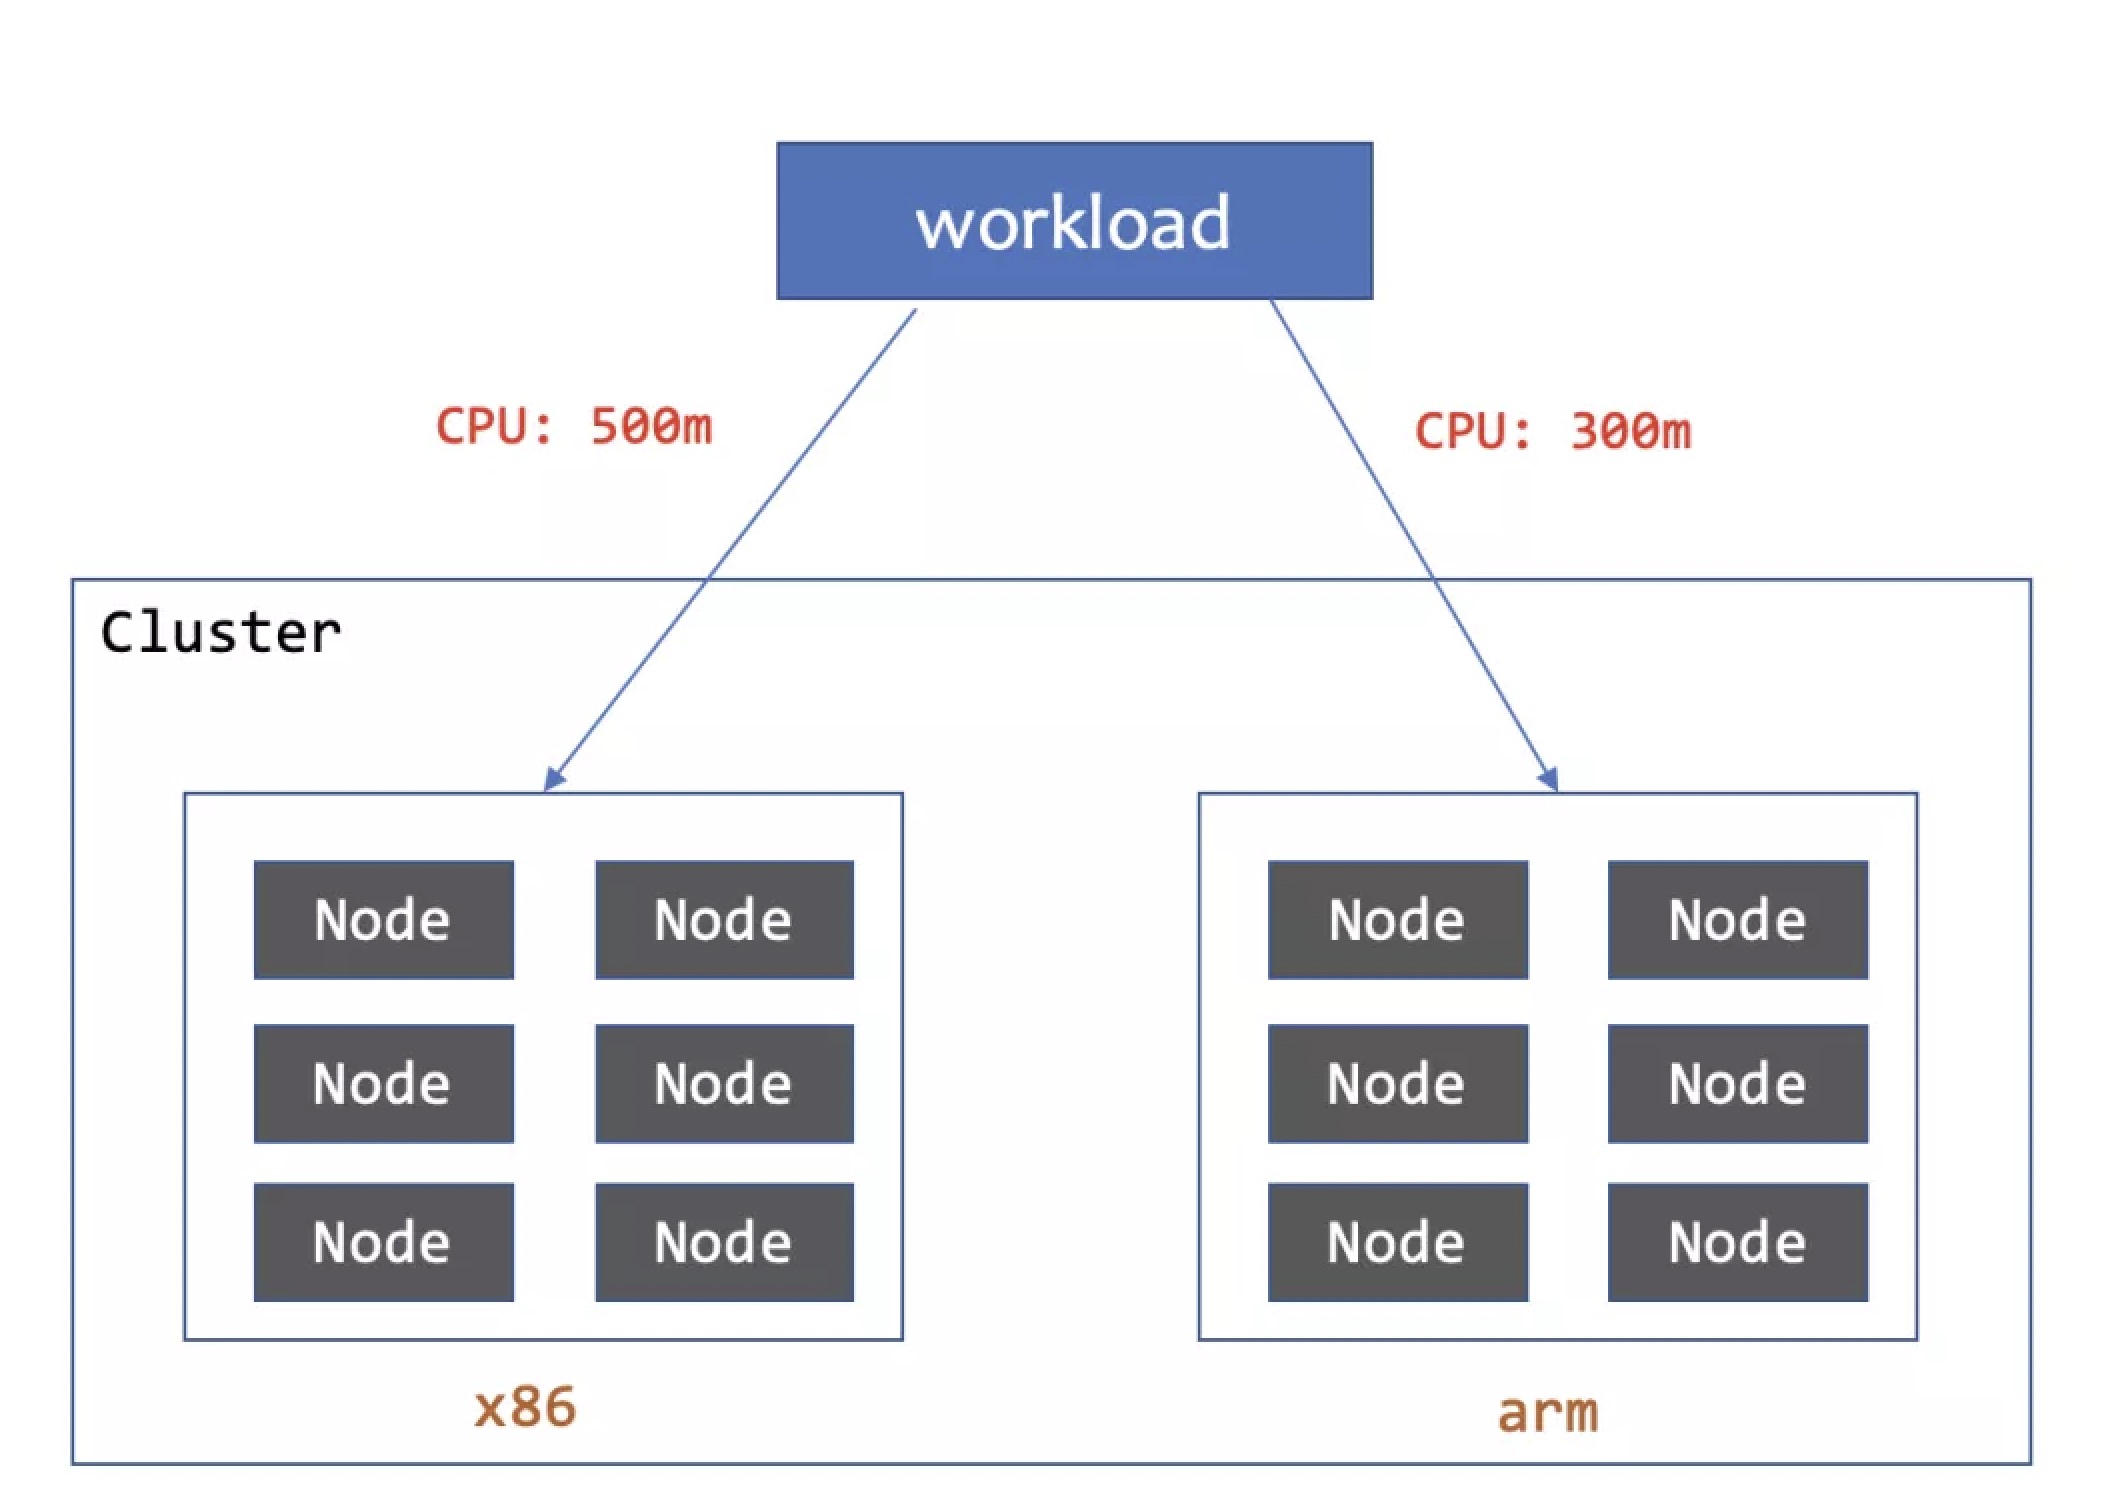
该案例中,客户分别采购了 Intel 、AMD 与 ARM 平台 CPU 的若干 ECS 实例,准备上线一个新的服务。用户希望调度到不同平台的 Pod 实例能表现出相近的性能,承载相同的 QPS。经过压测,发现以 Intel CPU 为基准,要承载同样的压力,AMD 平台需要更多的 CPU 核数,而 ARM 平台需要更多的内存。同时,客户采购的三种服务器中,按照算力单位,Intel 平台占约一半,AMD 与 ARM 各占约四分之一。
客户诉求这个新服务使用的 Workload 能够将 Pod 按照比例均摊到不同的算力上,并且针对不同的算力平台配置不同的资源量,以向下游调用方提供较为稳定的性能。使用 UnitedDeployment 的 Pod 自定义能力配合指定容量分配算法,可以基本满足需求。其中一个配置的实例如下:
apiVersion: apps.kruise.io/v1alpha1
kind: UnitedDeployment
metadata:
  name: my-app
spec:
  replicas: 4
  selector:
    matchLabels:
      app: my-app
  template:
    deploymentTemplate:
      ... # 省略业务工作负载模板
  topology:
    # intel、amd、倚天710ARM机型分别承载50%、25%、25%的副本
    subsets:
      - name: intel
        replicas: 50%
        nodeSelectorTerm:
          ... # 通过 label 选中 Intel 节点池
        patch:
          spec:
            containers:
              - name: main
                resources:
                  limits:
                    cpu: 2000m
                    memory: 4000Mi
      - name: amd64
        replicas: 25%
        nodeSelectorTerm:
          ... # 通过 label 选中 AMD 节点池
        # AMD 平台分配更多 CPU
        patch:
          spec:
            containers:
              - name: main
                resources:
                  limits:
                    cpu: 3000m
                    memory: 4000Mi
      - name: yitian-arm
        replicas: 25%
        nodeSelectorTerm:
          ... # 通过 label 选中 ARM 节点池
        # ARM 平台分配更多内存
        patch:
          spec:
            containers:
              - name: main
                resources:
                  limits:
                    cpu: 2000m
                    memory: 6000Mi
总结
弹性算力能够极大地降低业务的成本,并且有效地提高服务的性能上限。要用好弹性算力,需要根据具体业务特点,选择合适的弹性技术。下表是本文介绍的四种组件的能力对比总结,希望能够给您提供一定的参考。
| 组件 | 分区原理 | 易改造 程度 (非侵入性) | 分区 细致度 | 弹性能力 |
|---|---|---|---|---|
| WorkloadSpread | 通过 Webhook 修改 Pod | 高 | 中 | 中 |
| UnitedDeployment | 通过模板创建多个工作负载 | 低 | 高 | 高 |


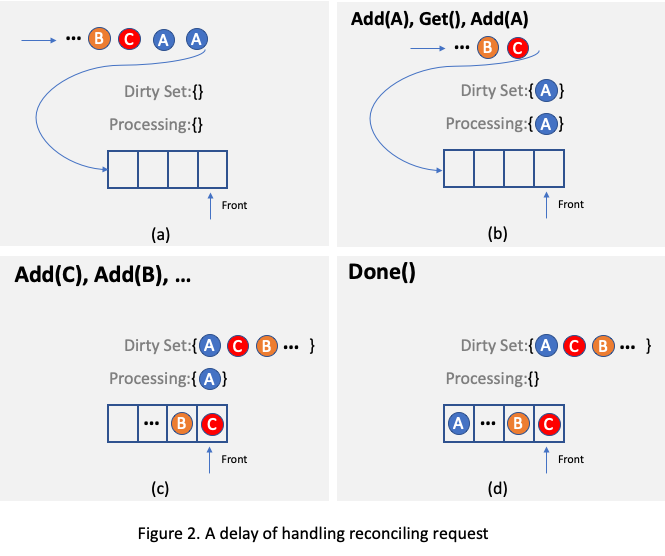 .... For example, as illustrated in
Figure 2, assuming there is only one reconciling thread and two requests targeting the same object A arrive, one of
them will be processed and object A will be added to the
.... For example, as illustrated in
Figure 2, assuming there is only one reconciling thread and two requests targeting the same object A arrive, one of
them will be processed and object A will be added to the